Learn how to make pastel tie dye items using 4 different techniques. Choose your favorite dyeing method and make your own pastel tie dye shirts and clothes at home.
Table of Contents
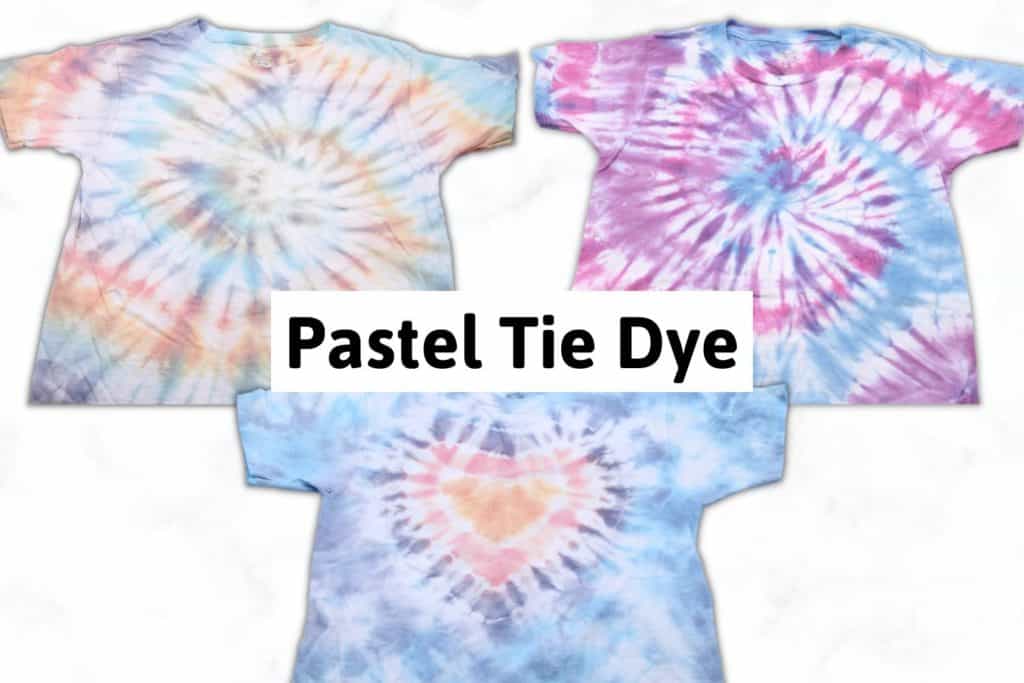
Pastel everything has become such a trend, especially in the world of tie dye. I made some pastel tie dye Crocs, but also wanted to show how you can make your own pastel clothes. There actually several ways you can get a pastel look so you can choose your favorite!
If you make some pastel tie dye clothes, I’d love to see it! Tag me on Instagram @ab.crafty.
Get the latest DIY tutorials, reviews, and crafting updates
You'll never be spammed and can unsubscribe at any time
Note: Some links in this post may contain affiliate links, which means at no cost to you, I may earn a commission.
Don’t forget to pin it so you can easily come back to it later!
4 Ways to Make Pastel Tie Dye Clothes
Click on each to jump to the instructions to learn about that method. The first instructions, using the pastel tie dye kit, have the full instructions for how to tie dye as well. The next instructions have the modifications.
- Use a Pastel Tie Dye Kit – this uses a kit like this one
- Use a Regular Tie Dye Kit – you can use a regular kit such as this one or one of the other tie dye kits I recommend. This method is my preference, but it has extra steps.
- Use Partially Synthetic Clothing – this uses a specific type of clothing
- Change the Setting Time – you can use a regular kit such as this one, but change the amount of time to set it
Pastel Tie Dye Method 1 - Using a Pastel Tie Dye Kit
Using a pastel tie dye kit is the simplest method since it uses the fewest steps. The down side is you can only use the kit to make pastel colors vs some of the other methods.
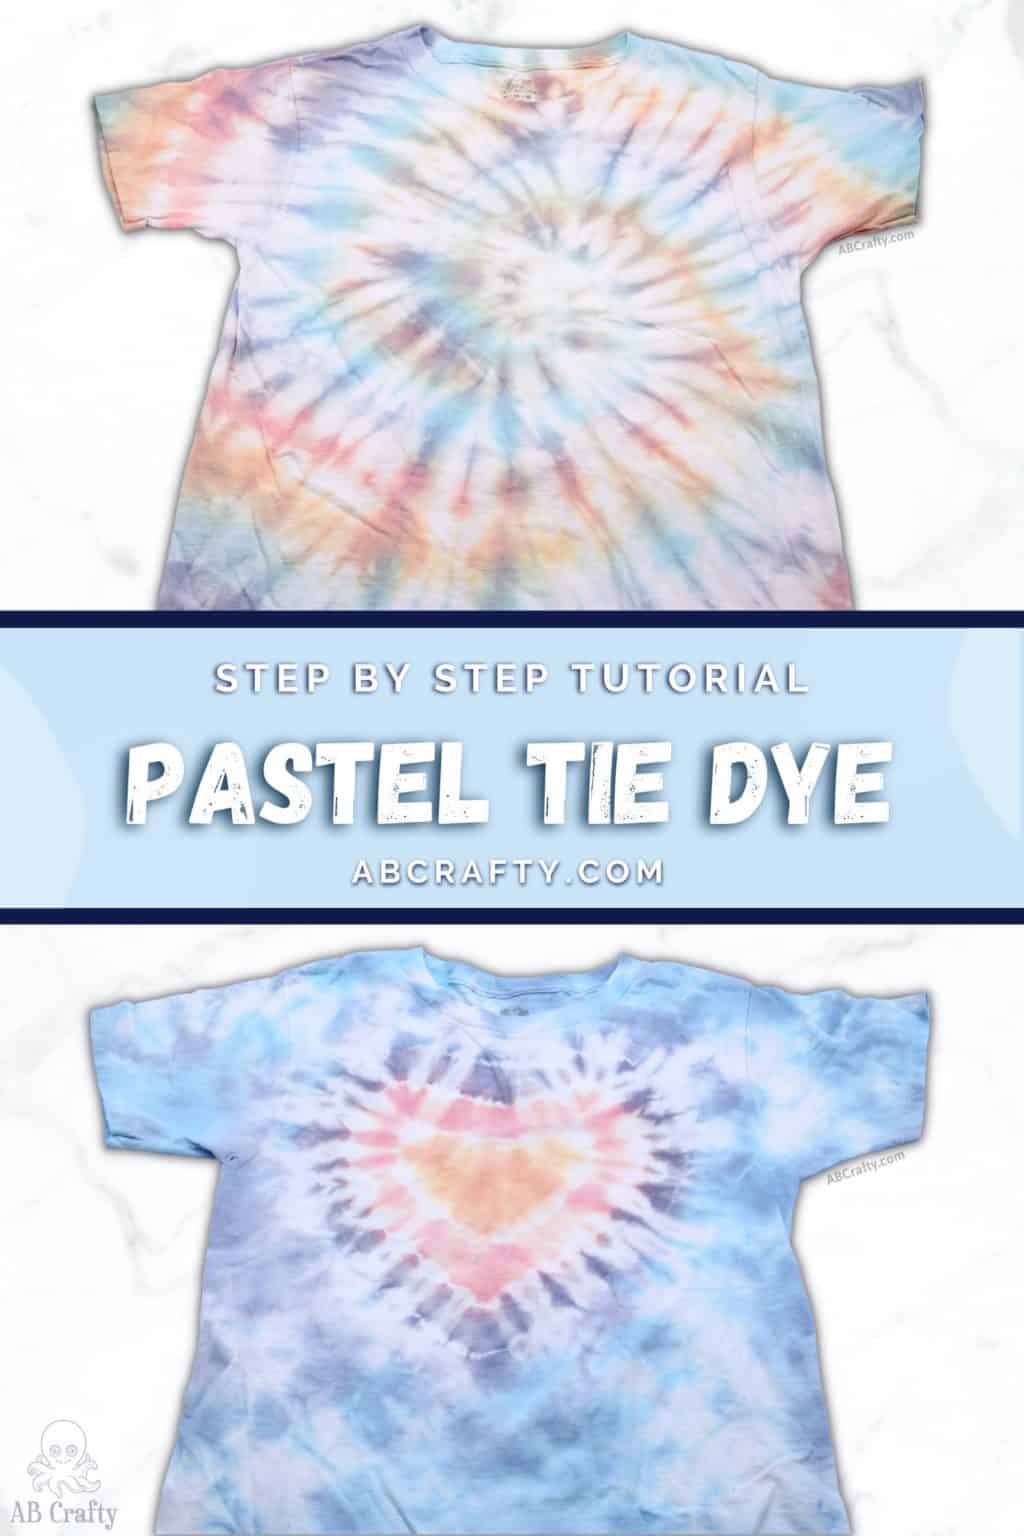
To demonstrate, I’m making a classic tie dye design – the spiral, but you can make whichever design you’d like. I also made a tie dye heart with this method.
Materials to Use a Pastel Tie Dye Kit
- Pastel Tie Dye Kit or Ombre Tie Dye Kit (I used this Tulip ombre one, but here are my recommendations for other pastel tie dye kits)
- White Cotton Shirt such as these or whichever item you’d like to dye.
- Plastic Wrap
- Zip Ties or Rubber bands (these are the ones I have) in case you don’t like the ones in the kit.
- Gloves (I always recommend getting a pair of gloves that fits well, even if the kit comes with them. I like these since I have small hands)
Steps to Use a Pastel Tie Dye Kit
Prepare the Shirt
If you’ve ever made a tie dye shirt or other clothes using a one-step kit, the steps are the same.
Start by washing it and removing it wet. If it’s dry then wet the shirt and squeeze out the excess water. Then twist and scrunch the shirt. For this one, I made a spiral shirt so I started by twisting it from the center.
Then tie the shirt with the rubber bands or zip ties.
As a next step, I do recommend also soaking the shirt in a soda ash solution like I do with all of my tie dye items (you can find soda ash on Amazon – you’ll mix 1 cup with 1 gallon of warm water and soak it for 20 minutes). However, for this one, I wanted to follow the instructions exactly as the kit says and since it’s a one-step kit, it already has the soda ash mixed with the dye.
Prepare the Dyes for the Pastel Tie Dye
Put on the gloves (the kits come with gloves, but they’re all terrible so I recommend getting ones that fit – I use these since my hands are small). Mix the dye according to the instructions. Typically you fill the bottles to the line and shake until the dye is all dissolved.
Get the latest DIY tutorials, reviews, and crafting updates
You'll never be spammed and can unsubscribe at any time
Dye the Shirt
Put plastic on the table. Then add the dye to the shirt. Be sure to add enough so that it’s fully saturated, but not dripping. It can help to push on and squeeze the dye into the shirt.
For the spiral design, add one color to opposite sections.
Add additional colors where you’d like. For the pastel rainbow spiral, add orange next to the pink. Then blue next to the orange. Then purple next to the blue.
Wrap it up in plastic wrap and let it set for at least 6 hours, but I recommend a full 24 hours.
Rinse it in the sink until it runs clear and then put it in the washer and dryer. Take it out and your pastel tie dye shirt is ready to wear!
These are my completed shirts using the pastel tie dye kit – the pastel rainbow spiral shirt and then you can follow these instructions to make the heart tie dye shirt.
You can also customize them further using the sublimation technique to add text or graphics!
Pastel Tie Dye Method 2 - Using a Regular Tie Dye Kit
This is absolutely the method I recommend as you can use the kit to make regular and pastel tie dye. Plus the kits are basically the same price so even if you just wanted to make pastel items, you’ll be able to make more things.
When dyeing anything, you make lighter colors by using less dye (if you’ve ever watercolored, it’s the same principle). So pastel tie dye kits simply have less dye in them. Therefore I recommend getting a regular kit such as this one and making your own pastel dye. The only down side is there’s an extra step in the process.
Materials When Doing Pastel Tie Dye with a Regular Kit
- Tie Dye Kit with Soda Ash (I recommend this one, but you can see all of my recommendations here)
- Soda Ash (in case your kit doesn’t come with soda ash you can find it on Amazon)
- Mixing Bottles or Containers (these bottles are great since they have the measurement lines)
- White Cotton Shirt such as these or whichever item you’d like to dye.
- Plastic Wrap
- Zip Ties or Rubber bands (these are the ones I have) in case you don’t like the ones in the kit.
- Gloves (I always recommend getting a pair of gloves that fits well, even if the kit comes with them. I like these since I have small hands)
Steps to Make Pastel Tie Dye with a Regular Tie Dye Kit
Prepare the Shirt and Dyes
You’ll prepare the shirt as normal – washing it and leaving it wet, but squeezing out the excess water. Then tie it in whichever pattern you’d like and soak it in soda ash solution for 20 minutes (you can get soda ash on Amazon). For this one, again I’m using the spiral method to be able to compare the shirts.
Prepare the Dye
Preparing the dye is the main difference with this method. You’ll want to prepare the dyes as normal, according to the kit’s instructions. This typically means filling the bottles to the line with warm water and shaking the bottles to mix the dye.
Get the latest DIY tutorials, reviews, and crafting updates
You'll never be spammed and can unsubscribe at any time
The next step is to dilute the dye. This is really the only difference between a normal kit and the pastel kit – the pastel kits don’t have as much dye powder in the bottle so they make a lighter color.
To dilute the dye, pour 50ml of one color into an empty squeeze bottle (I like to use these since they have the measurements on the bottle). Then add 150ml of water to the bottle so that measurement is now 200ml (I used a measuring cup with a pour spout to make it easy). If you’re not using a bottle with measurements, it’s 1 part dye to 3 parts water.
Shake the bottle to mix it up.
Repeat the process for each color.
Tip: This is a great time to mix new colors if you’d like! For example you could mix pink and blue to make purple. Just remember that the total amount of dye should add up to 50ml (not 50ml of each color).
Dye the Clothing
Now that your dyes are ready, you can use them just like normal. Add them wherever you’d like, making sure to get enough dye so that it’s fully saturated, but not dripping.
Then wrap it in plastic wrap and let it set for at least 6 hours, but I recommend a full 24 hours.
Then rinse it and wash it with other tie dyed items. Then your pastel tie dye shirt is ready to wear!
The best part about using this method is you have the option to use regular dye as well as pastel dye. Additionally, since you’re diluting the dye it will last much longer and you can tie dye more items (like 4x more!) with the same kit.
You May Also Like...
Pastel Tie Dye Method 3 - Using Partially Synthetic Clothing
An easy, though possibly risky way to make pastel tie dye clothes is to use synthetic clothing instead of cotton. This is because the dye in tie dye kits is made for natural fibers (cotton, bamboo, linens, etc). The dye is not made for synthetic fabrics (polyester, rayon, viscose, etc). In order to properly dye synthetic fabrics, you’d want to use a synthetic dye.
That being said, if you try to dye synthetic material with dye from a tie dye kit, some of the dye will likely still dye it. Most will wash off, but some of the dye will stay and therefore it will naturally create a pastel look.
Keep in mind, it’s also possible that none of the dye remains (which has happened to me before), so if possible, try and find something that has a small amount of natural fiber such as these shirts that are only 25% cotton. The more cotton you have, the less pastel and more vibrant the color will turn out.
Materials When Doing Pastel Tie Dye with Synthetic Clothing
- Regular Tie Dye Kit with Soda Ash (I recommend this one, but you can see all of my recommendations here)
- Soda Ash (in case your kit doesn’t come with soda ash you can find it on Amazon)
- Mixing Bottles or Containers (these bottles are great since they have the measurement lines)
- White Item to Dye made of partially synthetic or purely synthetic materials (in my case I used these joggers that were 100% synthetic, but this shirt would work great at 25% cotton)
- Plastic Wrap
- Zip Ties or Rubber bands (these are the ones I have) in case you don’t like the ones in the kit.
- Gloves (I always recommend getting a pair of gloves that fits well, even if the kit comes with them. I like these since I have small hands)
Process to Make Pastel Tie Dye with Synthetic Clothing
The process is exactly the same as making any other regular tie dye shirts or clothes. Therefore you can follow the same instructions as if you were using the pastel kit.
The only thing that will be different is when it comes to rinsing off the item. Nearly all of the dye will wash away so be prepared for that. But once you’re done, you should have a pale pastel tie dye shirt (or in my case – pair of joggers)!
Tip: I recommend testing this method in a small spot on the item that won’t be noticeable. This way you won’t have to go through the whole process and find out none of the dye stuck.
You can see nearly all of the dye washed off, but the light blue came out a perfect light blue. The navy and black pretty much came through as a light grey.
If I were to do it again, I would use more vibrant colors since the light blue came out nicely. I would also get clothes with a small amount of cotton (such as these shirts).
Pastel Tie Dye Method 4 - Changing the Setting Time
This method is simple enough – you’ll use a regular tie dye kit such as this one and dye the item per the usual instructions (you can reference the instructions of the pastel kit or these tie dye shirts).
However, the one change you’ll make is the setting time. Normally it’s recommended to set the dye for at least 6 hours (though I always recommend a full 24). Instead, you could set it for a short amount of time – such as only 30min-1hr.
Tip: If you want to use this method, I recommend testing a small area by rinsing the dye off in that area. If it looks okay then you can continue to rinse the rest of the item. But if it isn’t as vibrant as you’d like, then let it set a little bit longer.
More Tie Dye Projects to Try
Get the latest DIY tutorials, reviews, and crafting updates
You'll never be spammed and can unsubscribe at any time
Pastel Tie Dye Shirt
Materials
- 1 Pastel Tie Dye Kit
- 1 White Cotton Shirt
- Plastic Wrap
- Zip Ties or Rubber Bands
- Gloves
Instructions
- Wet the shirt and squeeze out the excess water. Then twist and scrunch the shirt. For a spiral design, twist it from the middle.1 White Cotton Shirt
- Tie it with zip ties or rubber bands or (this is the pack I have).Zip Ties or Rubber Bands
- Put on gloves and mix the dye according to the pastel tie dye kit's instructions (this is the kit I used).1 Pastel Tie Dye Kit, Gloves
- Put plastic on the table. Then add the dye to the shirt wherever you'd like.For the spiral design, add the same color to opposite sections.Plastic Wrap
- Wrap it in plastic wrap and let it set for 6 hours, but I recommend a full 24 hours.
- Rinse it in the sink until it runs clear and then put it in the washer and dryer. Take it out and your pastel tie dye shirt is ready to wear!