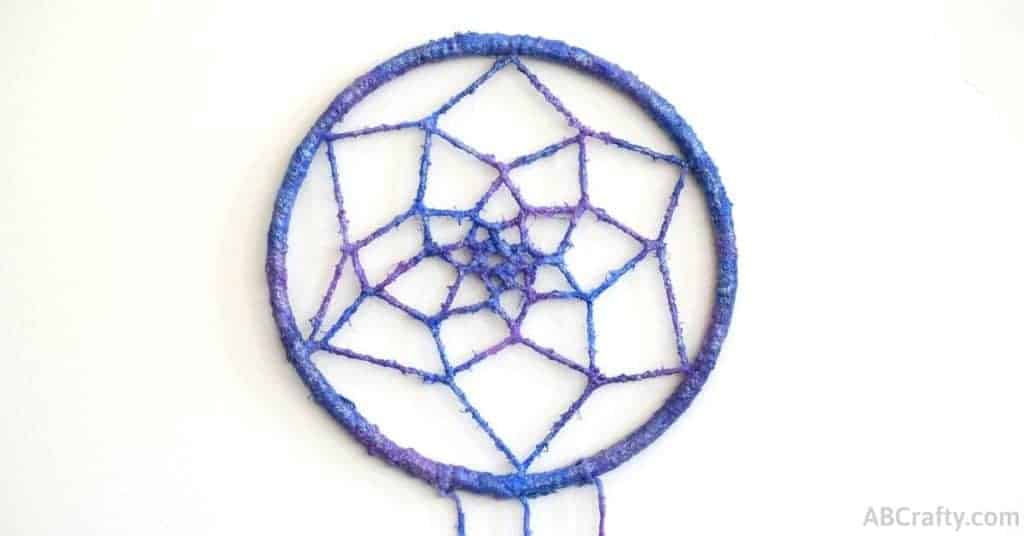
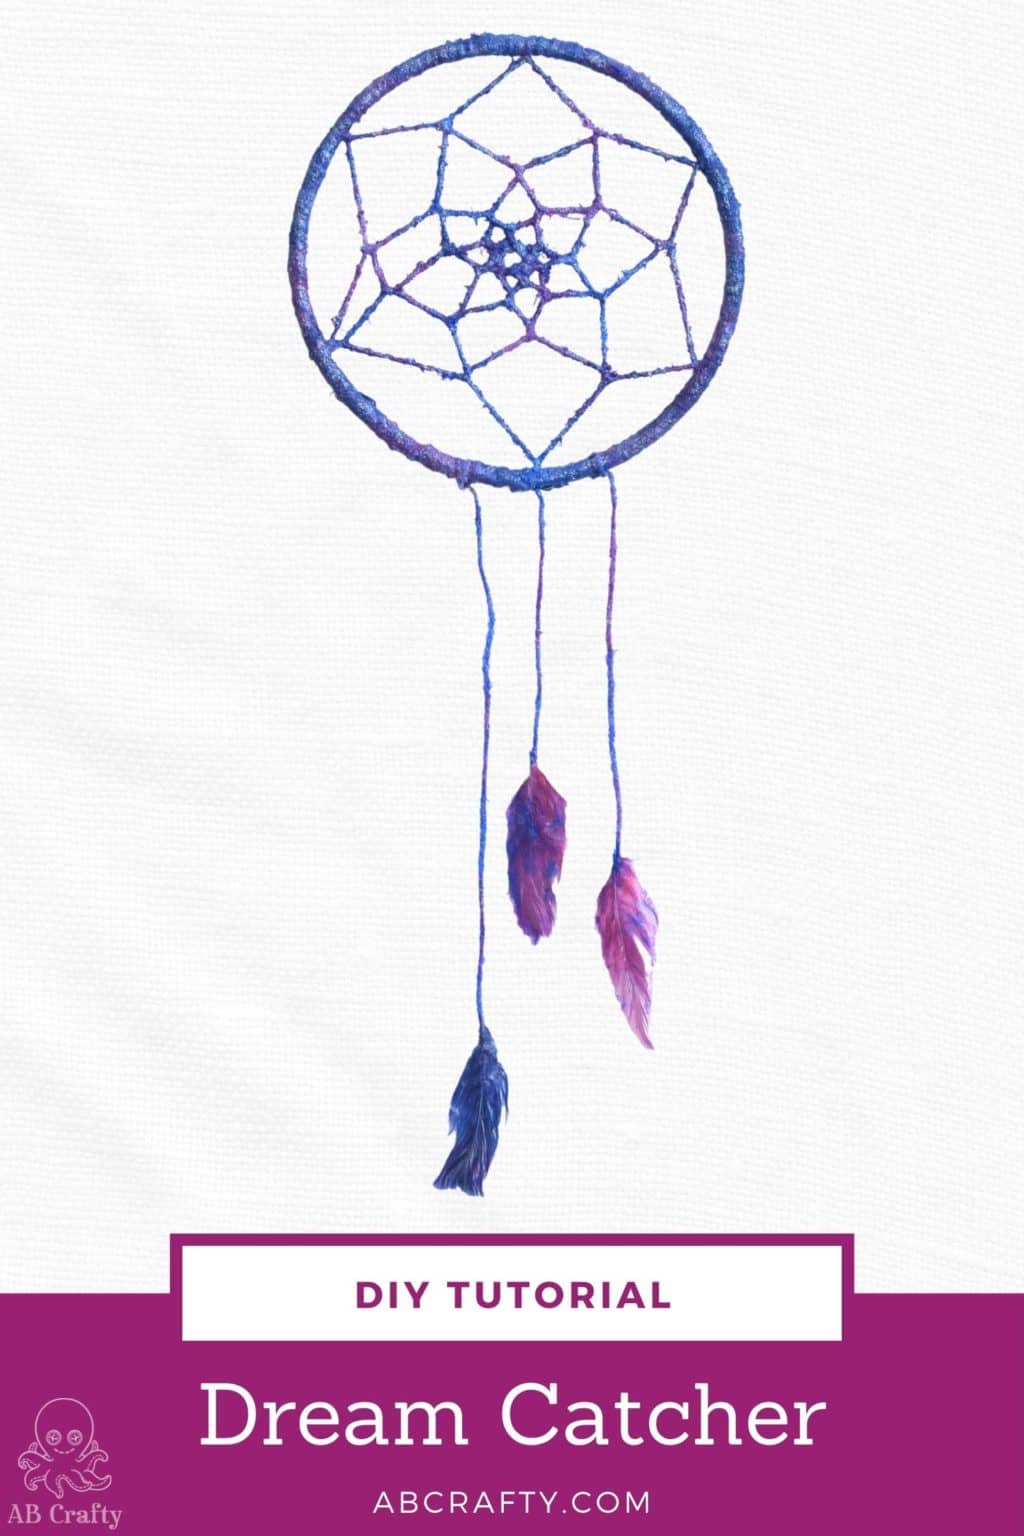
Keep the bad dreams away with this DIY dream catcher. I show you how to customize it and make it a galaxy dream catcher like mine. You’ll also learn how to make it glow in the dark.

Note: Some links in this post may contain affiliate links, which means at not cost to you, I may earn a commission. I am likely linking to items that can be trickier to get, making it easier for you to find the supplies you need.
What's the meaning of a dream catcher?
Materials for the DIY Dream Catcher:
- Thick wire
- Wire cutters
- Strong tape, such as duct tape
- Yarn, string, or hemp cord (I used scrap yarn since I was painting mine. If you don’t plan to paint yours, choose the yarn, string, or hemp cord in the color you would like)
- Fabric paint (If you’re going to paint it)
- Glow in the dark fabric paint (if you want it to glow)
- Feathers
- Glue gun
To start, cut the wire to the size you’d like your dream catcher to be. Then shape the wire into a circle and attach the ends to each other with a small piece of strong tape.
Note: Typically wire is sold in large coils so if you like the size the coil is already in, you won’t need to do much actual shaping.

Take your yarn or cord and tie a knot around the wire. Then begin wrapping it tightly around the wire, covering the loose end in the process. Be sure to cover all of the wire. Then once you reach the end, you can tie it into a knot around itself and cut it off.
Note: I used a thicker yarn for this because I wanted the ring to be thicker. If you only have one type of yarn or string and want it to be thicker, you can make multiple layers of wrapping.


Next, with a thinner yarn or cord, tie a knot around the hoop, cutting off the loose end. You want to try and get this between the wrapping so you can tuck it in to hide it.

Take the long end of this yarn, stretch it across the hoop so it reaches ~1/6 of the hoop’s diameter. Bring the yarn around the hoop and through the hole you just created with the yarn, creating a tightened loop around the hoop.
The end result should look like the image below.

Continue this process all around the hoop, creating your final loop at the same point at which you started. If you started making loops 1/6th down the hoop, then you should end up with 6 lines made with the yarn.
From here, you’ll continue to make loops, but instead of making it on the hoop itself, you’ll make them on the new lines of yarn you just made. As you can see in the image, wrap the yarn in the middle of the closest piece of yarn that’s stretching across the hoop.

Repeat this same process for the rest of the yarn lines you previously made.
Then once you’re done with that row, you’ll notice you’ve made a new set of lines with the yarn so continue wrapping in the middle of these lines.

Eventually the lines will become so small that you won’t be able to find a good middle point on which to make loops. At this point you can stop and tie off the yarn in a knot and cut it off.


At this point, if you do not want to paint your dream catcher, you can skip ahead.
If you would like to paint it, now is the time to have fun with it. I used puffy fabric paints for this because they’re less likely to be absorbed by the yarn. Paints such as acrylic will often get absorbed in and you’ll have to do several coats to get a solid coverage.
I actually put together a post on different types of fabric paints and the best ones to use for different projects.

Since I wanted to make a galaxy dream dream catcher, I mixed up purples, blues, and pinks from the fabric paints. (If you need help mixing purple or brown, I created a guide on how to make purple and brown).

I then painted these colors in random areas of the web and around the edge of the dream catcher, blending them together. This is also a good time to bring out the feathers and paint them as well.
I highly recommend doing this on some newspaper as it will get messy. You can see here I used a recycled plastic bag to cover my surface.


I found getting in there and using my fingers made the blending process easier. Though doing so made the paint absorb more into the yarn, which meant I ended up having to do another coat.

After I finished the first coat I tied long lengths of yarn to one end of the hoop. You can choose how many and how long you would like them to be. I ended up with three of varied lengths.

Paint these in fabric paint as well (I again ended up just using my fingers).
If you’re not painting it, then you can skip to either making it glow in the dark, or adding the feathers.

Add any additional coats you may need and once partially dried, you can turn it into a glow in the dark dream catcher.
To do so, you’ll want glow in the dark fabric paint. Apply it all over your dream catcher. And don’t worry that it’s covering your colors, it will dry clear.


Lastly, let everything dry and then use a glue gun to attach the feathers to the ends of the yarn that are hanging down.


Once that glue all dries, you’ll have a finished DIY dream catcher (galaxy, glow-in-dark, or regular).

I really need to improve my skills of taking photos in the dark so please excuse the potato quality, but you get the idea of how cool this looks once the lights are out.

If video is more your thing, you can also watch the full tutorial below:
More crafts you might like:

Dream Catcher
Materials
- Thick wire
- Strong tape
- Yarn, string, or hemp cord If you don't plan to paint yours, choose the yarn, string, or hemp cord in the color you would like
- Fabric paint This could also be acrylic paint, but if using acrylic, you'll likely need to do more coats
- Feathers
Equipment
- Wire cutters
- Glue gun
Instructions
Create the hoop
- Cut the wire to the size you'd like your dream catcher to be.
- Shape the wire into a circle and attach the ends to each other with a small piece of strong tape.
- Tie your yarn or card into a knot around the wire hoop.
- Wrap it around the wire, covering the loose end in the process.
- Be sure to cover all of the wire. Then once you reach the end, you can tie it into a knot around itself and cut it off.
Make the center web
- With a thinner yarn or cord, tie a knot around the hoop, cutting off the loose end.
- Take the long end of this yarn, stretch it across the hoop so it reaches ~1/6 of the hoop's diameter.
- Bring the yarn around the hoop and through the hole you just created with the yarn, creating a tightened loop around the hoop.
- Continue this process all around the hoop, creating your final loop at the same point at which you started. (If you started making loops 1/6th down the hoop, then you should end up with 6 lines made with the yarn).
- From here, you'll continue to make loops, but instead of making it on the hoop itself, you'll make them on the new lines of yarn you just made
- Repeat this same process for the rest of the yarn lines you previously made.
- Then once you're done with that row, you'll notice you've made a new set of lines with the yarn so continue wrapping in the middle of these lines.
- Eventually the lines will become so small that you won't be able to find a good middle point on which to make loops. At this point you can stop and tie off the yarn in a knot and cut it off.
- Tie long lengths of yarn to one end of the hoop. You can choose how many and how long you would like them to be. I ended up with three of varied lengths.
- Using the glue gun, glue the feathers to the end of the strings hanging down.
Paint the dream catcher
- Paint the web and feathers with fabric paint in the color(s) of your choice.
- Let the paint dry mostly before making it glow in the dark (or let it dry completely if you don't want it to glow in the dark)
Make it glow in the dark
- Paint glow in the dark fabric paint all over the dream catcher. Don't worry if it covers your colors, it will dry clear.
- Let it dry completely