Propagation Station – Laser Cut Bulb Vase Holder

finished laser cut plant propagation station with a bulb vase holding a small vine plant with the title "propagation station"

Get creative this spring and make your very own laser cut plant propagation station! Learn how to make your own with this easy-to-follow guide and download the template for free.

Note: Some links in this post may contain affiliate links, which means at no cost to you, I may earn a commission.

Table of Contents

This spring, why not make your very own laser cut plant propagation station? This is a great way to display new clippings while adding a touch of charm to any indoor space. You’ll be able to watch them grow in style!

This easy laser cut project is great for beginners and makes an adorable gift, especially when paired with some homemade seed paper. There’s also opportunity to customize it by adding cut outs or burned designs.

And to make it super easy, I’ve included the pattern for free that can be used with an xTool machine (this is the one I have).

Get the latest DIY tutorials, reviews, and crafting updates

You'll never be spammed and can unsubscribe at any time

What is a Plant Propagation Station?

A plant propagation station is a container or holder for plant cuttings, so they can grow roots and form a new plant. It can be used to propagate a single type of plant, or multiple types.

Often times it will be multiple small vases on a stand or hung on a wall. Since it uses clippings, the vases don’t need to be very big and are often made using test tubes. For this project, however, we’ll be making a mini station for one bulb vase that can be repeated for multiple vases.

Free Downloadable Laser Cut Plant Propagation Station Pattern

I designed this laser cut propagation station pattern for my xTool laser cutter to fit these vases. I’ve made the pattern available for free to download so you can make your own. Note that the current template will only work with xTool Creative Space.
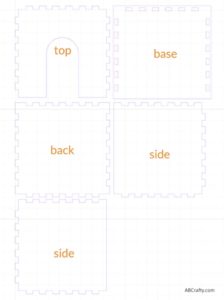
ABCrafty propagation station template image

Download the Free Propagation Station Pattern for xTool

We’re committed to your privacy. AB Crafty uses the information you provide to contact you about relevant content and products. You may unsubscribe from these communications at any time.

Don’t forget to pin it so you can easily come back to it later!
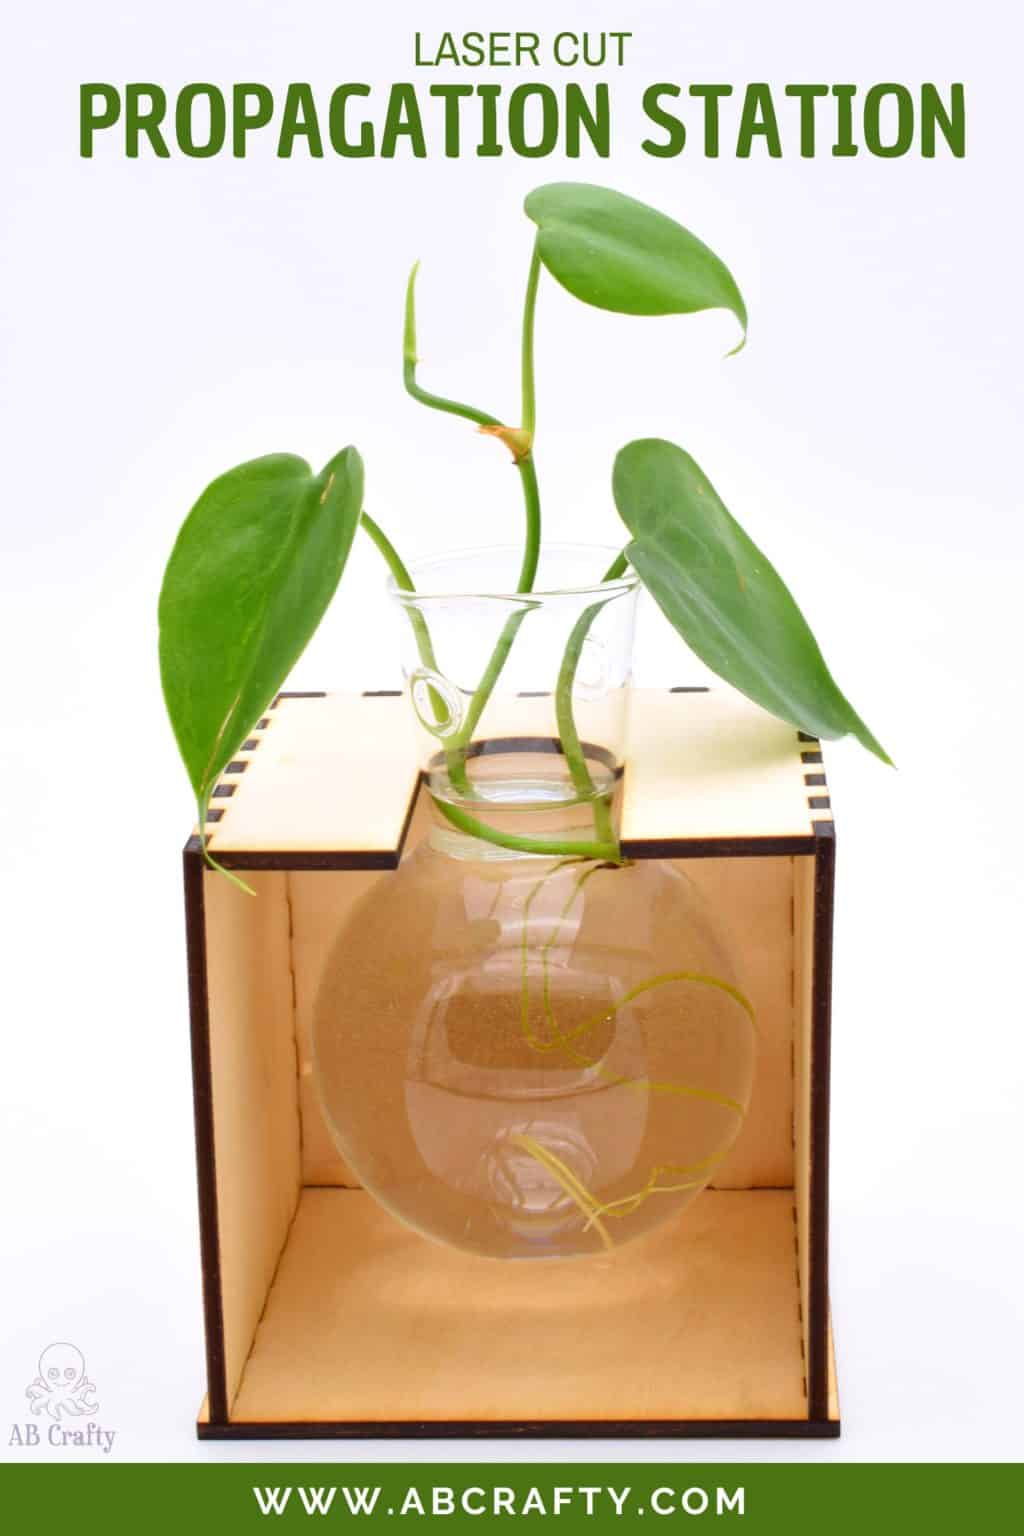
finished laser cut plant propagation station with a bulb vase holding a small vine plant with the title "laser cut propagation station, abcrafty.com"

Materials to Make the Propagation Station

Instructions to Make a Laser Cut Plant Propagation Station

Set Up the Laser Cutter

My laser cutter is the Xtool M1 10W so I needed to first place the triangle prisms on the laser bed of the machine. This allows air to flow underneath.

Note: Be sure to connect the exhaust pipe to outside. It’s out of camera-view, but I do have my exhaust pipe out the window.

placing the triangle prisms into the xtool m1

Place your plywood on top of the prisms, making sure you can see the red dot (you can see it faintly above the tip of my finger). I used one sheet of xTool’s basswood and still had a little bit left over.

basswood on the triangle prisms in the xtool m1, pointing to the red dot on the wood

Prepare the Propagation Station Pattern

Close the lid of your laser cutter and connect it to your computer.

Make sure if you’ve downloaded the free pattern (note that I have currently only made the pattern to be used with an xTool).

Open the file in xTool Creative Space and drag the images onto the basswood. In case the settings didn’t load, these are the settings:

  • Material: 3mm Basswood Plywood
  • Thickness: 3mm
  • Height Raised: Triangular prism
  • Cut: Power=100%, Speed=5, Pass=1
Note: The labels (e.g. “top,” “base,” “side,” etc.) will not show up in the final cut. They are simply labels so you know which piece is which.
xtool creative space UI showing laser cut propagation station template over the image of the plywood

Now is also the time to add any additional details if you’d like such as any cutouts or burned designs.

When you’re ready, click “Process.” Then it’s always a good idea to select “Framing” to make sure your image is truly completely on the material. You’ll want to watch as the laser draws a square of white light to show the outline of where it will cut. As long as you can see the white light the entire time, you’re all set.

If the light falls off the side of the material, adjust image in xTool Creative Space and test the framing again.

Then start the cutting process. Be sure to stay nearby in case there are any issues – never leave the machine unattended!

xtool m1 cutting out the laser cut propagation station pieces out of basswood

Get the latest DIY tutorials, reviews, and crafting updates

You'll never be spammed and can unsubscribe at any time

Assemble the Plant Propagation Station

After the cutting is finished, it should look like this.  You can then remove the pieces from the machine.

Tip: You can use a paper towel to wipe off excess soot from the sides of the pieces.

fully cut laser cut pieces from the plywood

Be sure to remove any holes – I like to use a Cricut weeding tool for this, but you can also use a toothpick.

If you’re interested in the tool, you can easily find it on Amazon.

Using a weeding tool to poke out the holes from the basswood pieces

Next is to assemble the base of the propagation station. I like to start with the base on bottom and then one side and the back. Fit them together loosely (otherwise it will be too difficult to fit the other pieces). Then add the other side piece.

Once all pieces are aligned, you can push them securely into place.

Tip: Use a rubber hammer or back of a screw driver to hammer the pieces together so they fit nice and snug.

adding one side and the back to the base
attaching the other side to the base
using the back of a screw driver to hammer the side of the box

To finish the assembly, you’ll want to add the top piece.

using the back of a screw driver to hammer the top of the station

(You may have noticed that the original top piece I cut out won’t actually fit. I realized this after the fact, but adjusted the design and printed a new top piece. Don’t worry, the pattern has the correct top.

comparing the old and new top pieces of the propagation station

Add the Vase and Clippings to the Propagation Station

I designed the pattern to fit a bulb vase (like this one). The opening is smaller than the opening of the vase so to insert the vase, you want to lift it up, slide it back into the propagation station, and then lower it.

sliding a bulb vase into the laser cut plant propagation station

Then all that’s left is to add water and your clippings! My clippings were from a pothos plant (you can get a similar one from FastGrowingTrees.com. If real plants aren’t your thing, you can also use it for some faux plant decor.

If you make your own laser cut plant propagation station, I’d love to see it! Tag me on Instagram @ab.crafty!

Get the latest DIY tutorials, reviews, and crafting updates

You'll never be spammed and can unsubscribe at any time

finished laser cut plant propagation station with a bulb vase holding a small vine plant

More Crafts to Try

Get the latest DIY tutorials, reviews, and crafting updates

You'll never be spammed and can unsubscribe at any time

finished laser cut plant propagation station with a bulb vase holding a small vine plant with the title "laser cut propagation station, abcrafty.com"

Laser Cut Plant Propagation Station

Get creative this spring and make your very own laser cut plant propagation station! Learn how to make your own with this easy-to-follow guide and download the template for free.
Yield 1 Propagation Station
Project Time 20 minutes
Total Time 20 minutes

Materials
  

  • 1 sheet 3mm Plywood
  • 1 Bulb Vase
  • Water
  • Plant Clippings

Equipment

  • 1 Laser Cutter
  • 1 Rubber Hammer optional

Instructions
 

Set Up the Laser Cutter

  • Set up laser cutter by placing the plywood on the laser bed and connecting it to a computer. In my case, I used my xTool M1.
    1 sheet 3mm Plywood
    basswood on the triangle prisms in the xtool m1, pointing to the red dot on the wood

Load the Propagation Station Pattern

  • Download the free pattern
    ABCrafty propagation station template image
  • Open the files in xTool Creative Space and drag onto the basswood. In case the settings didn't load, these are the settings to use:
    Material: 3mm Basswood Plywood
    Thickness: 3mm
    Height Raised: Triangular prism
    Cut: Power=100%, Speed=5, Pass=1
    xtool creative space UI showing laser cut propagation station template over the image of the plywood
  • Check the framing and then start the laser cut. Stay nearby in case there are any issues!
    xtool m1 cutting out the laser cut propagation station pieces out of basswood
  • Once cutting is complete, remove the pieces from laser bed and poke out the holes.
    Using a weeding tool to poke out the holes from the basswood pieces

Assemble the Propagation Station

  • Add the sides and back to the base.
    attaching the other side to the base
  • Attach the top. You can use a rubber hammer to secure everything.
    using the back of a screw driver to hammer the top of the station
  • Insert the vase into the propagation station by lifting it up and sliding it back in before lowering.
    1 Bulb Vase
    sliding a bulb vase into the laser cut plant propagation station
  • Add water and clippings and enjoy!
    Water, Plant Clippings
    finished laser cut plant propagation station with a bulb vase holding a small vine plant
Keyword Basswood, Home Decor, Laser Cutter, Plants, Plywood, xTool
Picture of Daniela Kretchmer

Daniela Kretchmer

Daniela is a lifelong crafter who loves to share her passion for crafting. Through classes or learning on her own, she likes to say she'll do pretty much any craft aside from scrapbooking. Her current personal obsessions include garden crafts, felting, and spinning yarn.

More Craft Projects and Ideas

Leave a Comment

Your email address will not be published. Required fields are marked *

Rating