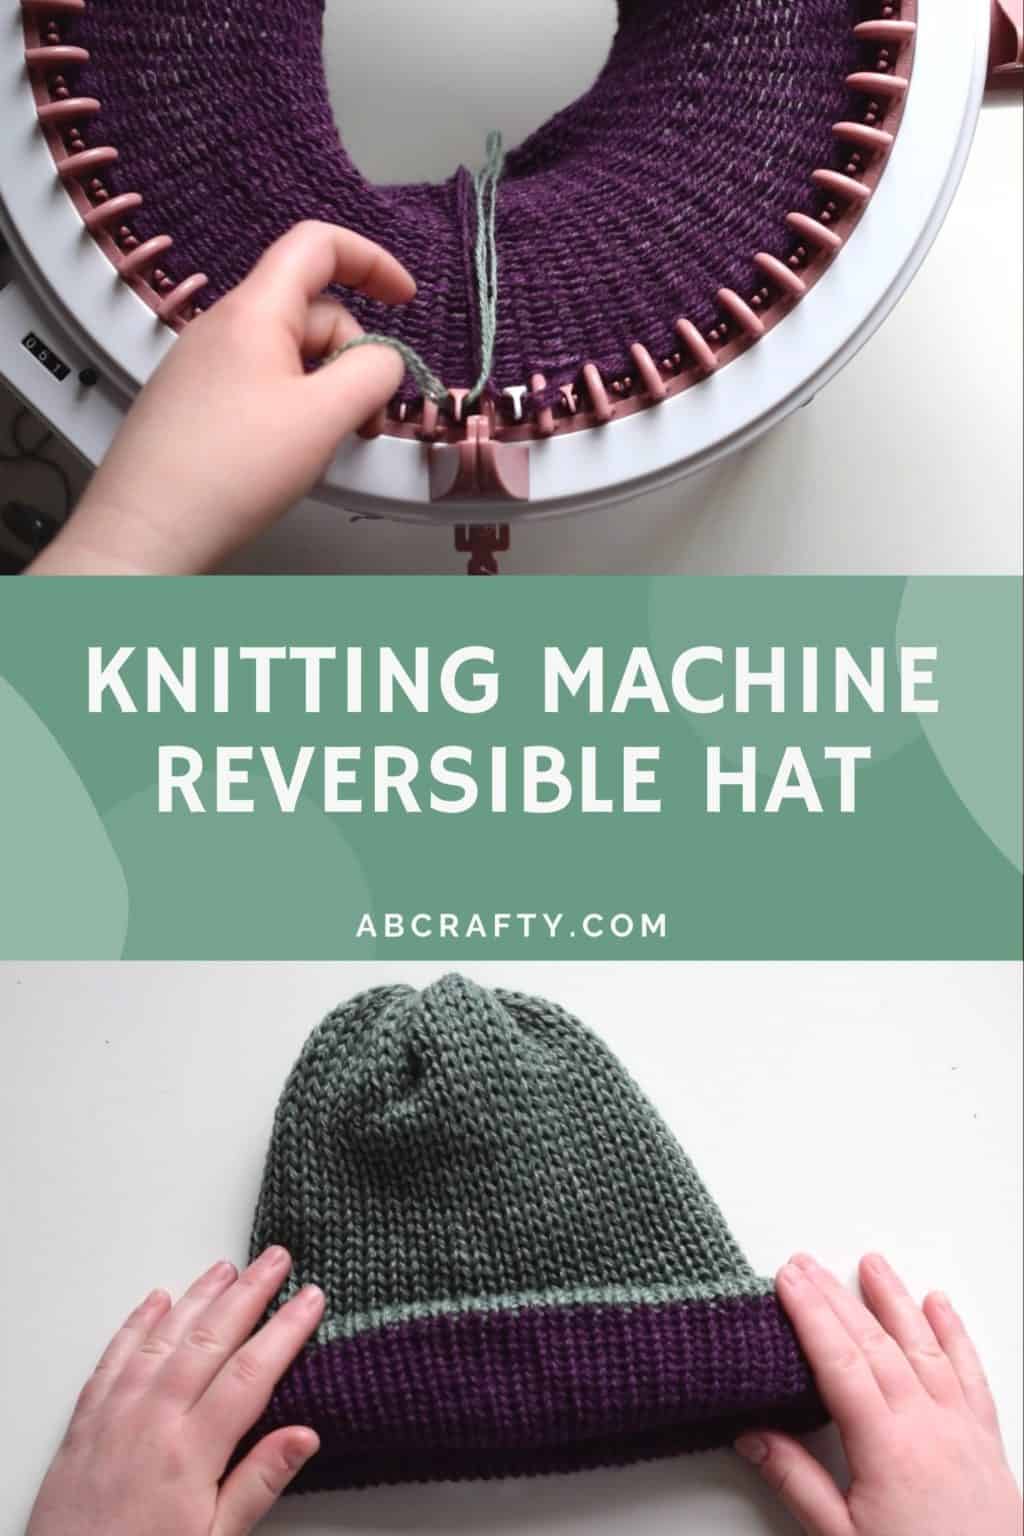
Sentro Knitting Machine Reversible Hat

Holding a green and purple reversible knit beanie over purple yarn knit on a sentro knitting machine with the title "knitting machine, reversible hat"

Learn how to use a Sentro knitting machine to make a quick and easy reversible knit hat. It’s a quick and easy craft project – from start to finish it only takes about an hour to knit an entire beanie.

If you want a bit more of a challenge, try making this Loom Knit Hat.

Table of Contents

Note: Some links in this post may contain affiliate links, which means at no cost to you, I may earn a commission.

What is a Sentro Knitting Machine?

The Sentro Knitting Machine (Amazon link) is a hand crank circular knitting machine that makes it easy to spin up knit projects and fiber crafts such as hats and beanies.

See all types of knitting machines in my knitting machine guide.

I have the 48 needle machine, which is their largest machine, but they come in different sizes to create different types of projects. I absolutely love mine and have included it in my list of the best craft gifts to give to crafters.

(Also for some reason mine says “Santro” even though the box was the actual Sentro box. If you have insight into this, let me know!)

Pink and white hand crank Sentro knitting machine with row counter on a white table but the label reads "santro"

I personally opted for the Sentro machine because of the price, but there are various machines out there including the Addi Knitting Machine (Amazon link) and the one Michael’s carries –  the Knit Quick Loops and Threads Knitting Machine (see my full guide to find the best one for you). I’m also pretty convinced the Loops and Threads machine is the same as the Sentro (without the row counter) so unless you have a Michael’s coupon, then I’d say go with the Sentro.

Be sure to get the one with the row counter though as I’ve found it extremely helpful. It automatically keeps track of the number of knit rows so you don’t have to use stitch markers.

Don’t forget to pin it so you can come back to it!

sentro knitting machine with purple yarn knit on it and a purple and green knit beanie with the title "knitting machine reversible hat, abcrafty.com"

Materials to Make a Reversible Knit Hat on the Sentro Knitting Machine

  • Sentro Knitting Machine (I have the 48 needle knitting machine – linked here)
  • Yarn in two contrasting colors (Use a worsted weight or thinner – I used 3 strands at a time of fingering weight alpaca yarn in purple and light green)
  • Plastic Needle (this comes with the machine)
  • Scissors
  • Yarn Bowl, optional (these are great options to keep your yarn organized while knitting)

Video Instructions

How to Use a Sentro Knitting Machine to Knit a Tube

Select the Correct Setting

All projects on a circular knitting machine will start the same way, regardless of which machine you have (this is the one I’m using). To start, clear your row counter by pressing on the black button next to the counter. Also make sure the machine is set to “T” for “Tube.”

Setting a sentro knitting machine to tube by flipping the switch to T

How to Knit the First Row on a Sentro Knitting Machine

The first round is different from all the rest with the first 3-4 rounds being the most important. To start the first round you want to find the white needle and place it in front of the yarn holder on the machine. This will cause the white needle to lift up.

Measure roughly a foot of yarn and allow that end to hang into the middle of the machine. Pass the yarn in front of the white needle, moving from right to left.

NoteThe white needle is used as your starting and ending point so you can make sure you knit a complete row.

I used 3 strands of yarn at once (this is similar to the one I used), but if you’re using a thicker yarn, you only need to use one strand at a time. (If you need to use two strands, but only have 1 ball, you can make a two-stranded ball with a yarn winder).

placing purple alpaca yarn around the white needle of a sentro knitting machine

Turn the crank on the knitting machine slightly so that the next needle moves in front of the yarn holder. Then pass the yarn behind this needle.

Tip: To keep the yarn organized and not rolling everywhere, I’m using a yarn bowl. Mine is ceramic from a local shop, but these are great options.

You can also see my full guide to the best yarn bowls.

Moving behind the second needle on the sentro knitting machine with the yarn
Turn the crank again to move the next needle in front of you and up. Pass the yarn in front of this needle.
Placing the yarn in front of the third needle of the sentro knitting machine

Again, turn the crank slightly again and pass the yarn behind the next needle.

Notice how as you continue to pass the yarn in front and behind the needles of the knitting machine that the needles to the right pull the yarn down. This “locks” the yarn in place. Make sure this happens as you work along the machine, otherwise it is considered a dropped stitch.

putting the purple alpaca yarn in front of another needle with the needles next to it catching the yarn

Continue this pattern of alternating passing the yarn in front and behind of the needles.

Tip: The needles are also numbered so you can use those numbers to remember to place the yarn in front or behind (for example, all odds will be behind, while evens will be in front).

Once you get to the white needle again, pass the yarn again in front of the white needle.

You’ll also see the counter now will read “001” as you reach the white needle.

Putting the yarn in front of the white needle again after it has gone all the way around

How to Knit the Next Few Rows on a Sentro Knitting Machine

You have now completed your first row on the Sentro knitting machine.

From now on you do not need to pass the yarn behind the needles. You will simply put the yarn in front of the needles. Continue to work slowly and slowly crank the knitting machine while you make sure the yarn is in front of the needles and that each needle pulls the yarn into the machine.

Multiple needles with the yarn in front

After you finish the second row with the yarn only in front of the needles, you no longer have to hold the yarn yourself.

Pull the yarn through the yarn holder. I like to do this by holding the yarn in front and in back of the holder and pushing it down so it almost “snaps” into place.

placing the yarn through the yarn holder of the sentro knitting machine

This is what the yarn and knitting machine should look like with the yarn in the holder.

(The reason the counter still says 1 is because I accidentally pressed the clear button while knitting the first row of yarn.

the yarn pulled through the yarn holder in the sentro knitting machine

Place the Yarn in the Sentro Knitting Machine Tensioner

After pulling the yarn through the holder, you can then place it through the yarn tensioner. This is the part that sticks out of the Sentro knitting machine with the 3 holes in it. Each hole provides a different amount of tension. You’ll want different tension for different yarns and projects.

Note: You can see the yarn bowl I’m using in the bottom left. I ended up using another bowl for the other ball of yarn since they didn’t both fit. Here are some great options similar to mine. You can also see my guide to the best yarn bowls.

pulling the strands of yarn through the first loop of the tensioner on the sentro knitting machine

Once you have the yarn set, you can crank the knitting machine carefully for the next few rounds. Keep an eye out for any dropped stitches. These first 3-4 rows are the most important. After the first 3-4 rounds you can then start moving more quickly.

And that’s all there is to using the Sentro knitting machine to knit in a tube! From there it’s simply a matter of what project you want to make. For this I continued on to make a reversible knit hat.

Get the latest DIY tutorials, reviews, and crafting updates

You'll never be spammed and can unsubscribe at any time

How to Knit a Reversible Beanie on a Sentro Knitting Machine

Continuing with the instructions above, knit a total of 50 rows onto the Sentro knitting machine using a single color of yarn. After your 50 rows, end with the white needle to the right. Then cut the end so that you have about a foot of extra yarn.

Note: As a reminder, I had thinner yarn (fingering weight) so I used 3 strands at once – this is similar to the one I used.

several rounds of purple alpaca yarn knit on the sentro knitting machine and cutting the yarn over the counter on the sentro knitting machine

How to Change Colors of Yarn on a Sentro Knitting Machine

Remove the purple yarn from the tensioner and yarn holder. Place it towards into the middle of the knitting machine between the white needle and the needle to the left of it.

Then with your next color (I used the same yarn, but in a light green color), measure out a foot of yarn and again put that end towards the middle. Pass the rest of the yarn in front of the next needle.

Choosing any two of these colors, you really can’t go wrong.

purple yarn hanging in the middle of the knitting with the white needle of the sentro knitting machine to the right and the end of new green yarn starting in front of the next peg to the left

Hold the yarn while you have it pass in front of each needle for the next row. Because you’re starting with new yarn it’s a good idea to be careful with this first row to make sure you don’t have any dropped stitches.

Now is also a good time to reset the counter to 0 so you can count it to 50 or you can keep it going and have it count to 100.

placing the green yarn in front of three needles on the sentro knitting machine

Knit another 50 rows with this new color and again end the last row with the yarn passing in front of the white needle.

To make sure you have enough extra yarn, measure the yarn around the Sentro knitting machine and cut it. Or you can measure about 2 feet extra.

50 more rows of the green alpaca yarn knit into the hand crank knitting machine

How to Remove the Hat from the Sentro Knitting Machine

Thread your plastic needle with the yarn.

Then crank the machine a full row around. This will allow the machine to finish the last row.

green yarn looped onto a pink plastic needle

Starting with the needle to the left of the white needle, push the plastic needle through the loop. Move from the middle of the machine to the outside.

Pink plastic needle going through a loop of green yarn to the left of the yarn holder on the sentro knitting machine

Pull the yarn through the loop.

pulling the needle through the loop so the yarn pulls through

Continue needle by needle lifting the loops onto the plastic needle. After you get a few of them done, you’ll have more room to work and can lift up a few loops at once. However, be careful not to drop any loops.

Scooping a few loops of yarn with the plastic needle

Finish up gathering all of the loops, but keep it relatively loose as we’ll close the opening in a bit.

Scooping the last couple loops of yarn from the sentro knitting machine with the plastic needle

How to Finish the Reversible Hat

Pull the project inside out and find the ends of the yarn from when you changed colors.

With the purple and green knit tube inside out, tying the ends of each color together in a knot

Tie the ends into a secure knot. In doing so, you’re closing the loop of that stitch so make sure it’s not too tight or too loose so that the stitch matches the others.

pulling the knot of purple and green yarns tight

Once secure, cut off the ends.

cutting the ends of the purple and green yarn after tying the knot

Pull the knit tube partially right side out so that the ends of each color meet.

You’re now going to close those ends, but it it’s easiest to do them one at a time. Start with the one on the inside and pull on the end of the yarn so that edge starts to close. Carefully pull it tight and move the stitches to form a tight circle.

Tip: Be very careful here as you do not want to break the yarn. However you want to make sure the circle is tight so as not to let any air in when worn.

pulling the green side of the knit tube through the middle and part of the way out the purple and pulling the end of the green yarn to make the circle close

After you have the hole closed on the inside edge, keep the end of the yarn outside and close the end of the other color. (See the green yarn hanging out while I pull on the purple yarn)

Pulling on purple yarn to close the end of a reversible knit beanie

Once you close both sides, tie the ends of both colors together into a secure knot.

tying the ends of the purple and green yarn together so that the purple end closes up

Cut the yarn to a more manageable length and thread it onto the plastic needle.

cut the ends of the yarn to make it more manageable

Sew into the knit hat between the two layers.

using the plastic needle to sew into the middle of the reversible knit beanie

Come out part way through the knit beanie and cut off the excess so that the rest of the yarn is hidden between the layers.

cutting the end of the yarn after sewing it into the middle of the knit hat

Your reversible knit beanie is now complete!

Another option is you can make a pom pom to attach to the top. After making it, you can follow these instructions to attach it.

Get the latest DIY tutorials, reviews, and crafting updates

You'll never be spammed and can unsubscribe at any time

You can either wear it as a solid color or flip the brim up for fun contrasting brim.

Here’s each side as a solid color.

You can reverse it throughout the day to whatever color you’d like, or you can pull just the brim back.

rolling the reversible knit hat so that it flips the colors so that the purple will be on the outside and the green is on the inside

Here’s each color with its contrasting brim.

Frequently Asked Questions About Sentro Knitting Machines

Which size of Sentro knitting machine should I get?

Sentro makes multiple sizes of knitting machines, including a 48 needle, 40 needle, and 22 needle. For large adult hats you’ll want to get the 48 needle machine. For smaller hats, get the 40 needle machine. If you want to make smaller items such as socks, leg warmers, stuffed animals, etc. get the 22 needle machine.

You can learn all about knitting machines and which one you should get in my full guide.

What's the difference between a Sentro Knitting Machine and the Loops and Threads or Addi Knitting Machine?

I’m convinced there’s little difference between the Sentro and Loops and Threads Knitting Machines other than the color. However, unlike the other two, the Addi Knitting Machine has some metal and therefore more durable. All three machines are hand crank knitting machines, but I’ve seen modifications in which people add motors to them.

So if you plan to continually use the machine it may be worth it to spend the $200+ on the Addi Machine. But if you only plan to use it for hobby crafting, I’d say go for the Sentro or the Knit Quick Loops and Threads machine. The Sentro is around $50 and the Loops and Threads is around $75, but with a coupon you can get it for much cheaper (please only get it with a coupon!). And to see all types of machines, here’s my full guide to knitting machines.

Is the counter worth it?

Absolutely! I’m not someone who likes to keep track of things (I tend to get overexcited and count rows too soon and therefore mess up the count) so I find it extremely helpful to have the counter. This means I don’t have to worry about it other than making sure I remember to actually look at the counter!

More Fiber Arts Projects to Try

And to find the right machine for you, see my full knitting machine guide.

Get the latest DIY tutorials, reviews, and crafting updates

You'll never be spammed and can unsubscribe at any time

Picture of Daniela Kretchmer

Daniela Kretchmer

Daniela is a lifelong crafter who loves to share her passion for crafting. Through classes or learning on her own, she likes to say she'll do pretty much any craft aside from scrapbooking. Her current personal obsessions include garden crafts, felting, and spinning yarn.

More Craft Projects and Ideas

22 thoughts on “Sentro Knitting Machine Reversible Hat”

  1. I’m having some issues wirh tension. I use the middle tension fuide, but my work came out very loose, and looking more like rib stitch than stockinette. I used category 4 acrylic yarn. How can I fix this?

    1. If it’s too loose, use the tightest tension setting. You can also loop it through more of the loops for even higher tension (e.g down the first, up the second, and back down the third).

    1. Yes, that is what happens when making a single layer. One of my favorite hats I’ve knit is like that and I love how it looks – it’s simply a different style of hat that has a rolled up brim.
      If you would prefer a different style and it’s already made, you can fold the bottom of the brim to the inside and sew it to from the inside so that you’ll have a double brim. Another option is to crochet a row along the bottom. Both of these will prevent the hat from rolling up.

      1. How do you make a hat big enough for an adult with the 48 needle machine? I made one today with DK yarn and it’s really only big enough for a small child. It was tight on my 13 yo, so I’m thinking it would fit a 5-8 year old at most. Would using a worsted yarn really make that much difference in size? If I hand knit a hat in worsted, I’m casting on 90+ stitches, so I just can’t work out how a machine knit hat in worsted will fit an adult, but every tutorial I read or watch says they’re using a 48 needle machine. I’m so confused! Haha

        1. Starting with the concern about the number of stitches vs when using needles – it’s all about the gauge of the knitting machine, which will translate to the stitches per inch. You can try making a sample on the machine and with your needles using the same yarn and you’ll see you’re likely getting many more stitches per inch by hand. The machine will likely create a more loose knit. For reference, I just measured the beanie from this tutorial and it’s 3 stitches per inch and 5 rows per inch.

          Then for the concern on the size, it’s likely more about the tension. Try casting on more loosely and keeping the tension loose. When you cast on more tightly and keep the tension high, you’ll make a tighter knit unintentionally. My recommendation is to make some swatches using different tension and test using the DK vs worsted yarn until you get the combination that gives you the fewest stitches per inch. The goal is to get 2 stitches per inch or fewer (without stretching it).

  2. Hi I’m thinking of buying the sentro 48 needle machine I have made hats on a circular loom 41 needles will the machine make bigger hats than the loom or is it the type of wool that’s makes the hat bigger or smaller I’m only learning
    Thanks
    Ali

  3. When I looked at this machine on Amazon, I was under the impression it made flat items as well as round hats. Is this correct or have I just wasted my £50 as I don’t want to just make hats 🤔

Leave a Comment

Your email address will not be published. Required fields are marked *