Tie Dye Pumpkin – How to Tie Dye a Pumpkin Design

finished tie dye pumpkin shirt with a pumpkin in the middle and black tie dye edges with the title "pumpkin tie dye"

Learn how to make a tie dye pumpkin design on a shirt. Celebrate fall or Halloween with this unique pumpkin tie dye design.

Table of Contents

Continuing the tie dye trend, I wanted to try to make some Halloween tie dye shirts. So of course I had to start with a tie dye pumpkin, but you can explore all of the patterns I’ve made.

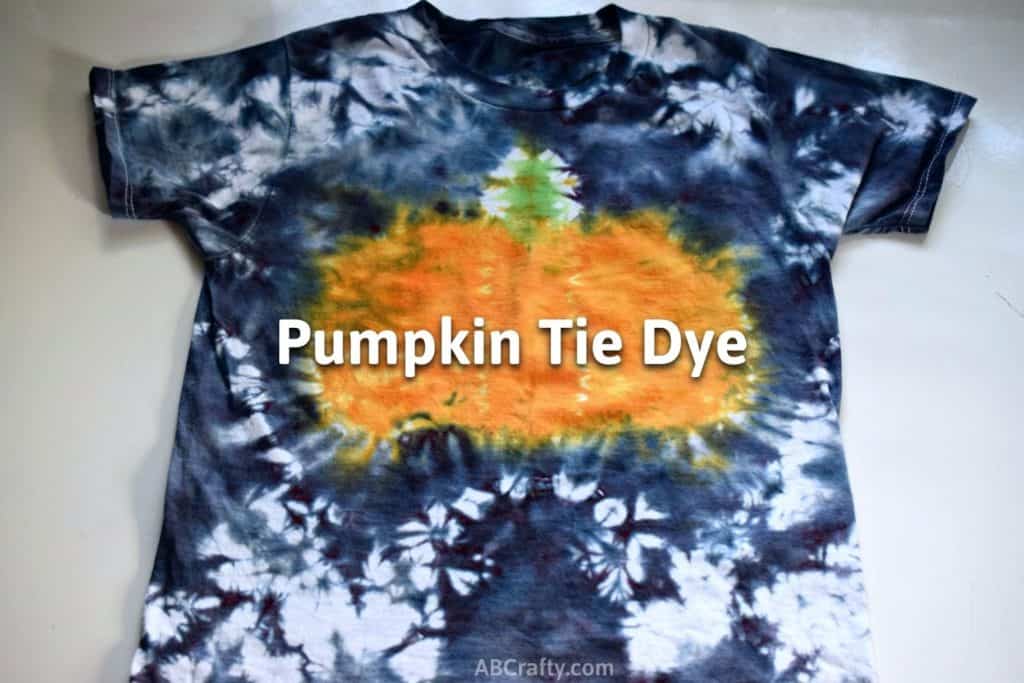
I’ll admit, this was my second try, but I’m quite pleased with how it came out and am excited to share how to make one yourself. And I dyed a shirt, but you can of course dye whatever you would like such as making a tie dye sweatshirt or socks.

I also made some easy to use templates to make it super easy to make this shirt and other Halloween tie dye shirts.

I recommend pairing it with some pumpkin cinnamon rolls to go all out on the theme! And here are some ghost pathway lights you can make.

Note: Some links in this post may contain affiliate links, which means at no cost to you, I may earn a commission.

Be sure to pin it to save it for later!

top photo of a tie dye pumpkin shirt and the bottom photo is drawing half a pumpkin onto a folded shirt with the title "pumpkin tie dye"

Materials to Make the Tie Dye Pumpkin Shirt

Free Downloadable Halloween Tie Dye Templates

Download these templates to make it easy to make this pumpkin tie dye shirt and other Halloween tie dye shirts. Each template is on its own page so you can print the ones you want. Download it below or in the shop.

Scale it to the size you want and print it out to make it super easy to draw the design.

free printable tie dye template outlines of a bat, pumpkin, candy corn, and ghost with the title "halloween tie dye printable templates"

Download the Free
Halloween Tie Dye Templates

We’re committed to your privacy. AB Crafty uses the information you provide to contact you about relevant content and products. You may unsubscribe from these communications at any time.

Instructions to Make a Tie Dye Pumpkin

Before anything, be sure to wash your shirt so that it removes any chemicals or anything that will prevent the dye from soaking in.

Draw the Design for the Tie Dye Pumpkin

Fold the shirt in half and draw half of a pumpkin outline using a washable marker. Use the free downloadable template to make it super easy. Cut out the template and trace around it.

Tip: Use the same color marker you want to dye the section. This way you can easily see the different sections when folded up. Therefore for this section I recommend using an orange marker. Also make sure it’s a washable marker, otherwise you’ll end up dyeing the shirt!

using an orange washable marker to draw the outline of a pumpkin on a folded white shirt

If you want the pumpkin to have extra details, draw lines connecting the top and bottom.

using an orange washable marker to draw the inside lines of a pumpkin on a folded white shirt

Lastly, use a green washable marker to draw half of a stem at the top.

half of a pumpkin drawn on a folded white shirt as the template for a tie dye pumpkin

Sew the Design

Use a needle and thread to do a basic running stitch around the outside of the pumpkin. Start and stop your thread on the same side. So I came down from the top of the shirt and ended coming back up to the top of the shirt.

Leave plenty of thread available as you’ll use it to tie everything together.

Tip: Just as with the orange marker, I recommend using orange thread as another identifier.

the outline of an pumpkin sewn with orange thread on a folded shirt

Next, sew along each line you drew in the body of the pumpkin. Just as before, start and stop on the same side of the shirt and leave enough thread to tie it.

You can also do this with the stem and use green thread. This is what I originally did, but my thread broke so I ended up using a clip.

sewing the lines of the middle of a pumpkin on a folded shirt for a tie dye pumpkin design

Wet, Tie, and Crumple the Shirt

To make sure you get the most detail from your tie dye pumpkin, soak the shirt in water and squeeze out the excess.

Then start with the middle stripes of the pumpkin and gently pull on the thread. This will create folds in the shirt.

pulling on an orange thread to make folds in the shirt

Tie it off using the ends of the yarn.

Repeat the process for the other stripe and the outline of the pumpkin.

Tip: For the outline, it can be easier to pull it from one side at a time to make sure the thread doesn’t break.

tying a knot with orange thread on the shirt to hold the folds in place

If you were able to sew the stem, repeat the process above with the thread of the stem.

If not, fan fold along the line and place the clamp along the line. Make sure the clamp is not along the fold as that’s where the dye will go.

clamping the folded stem with a clamp

For the rest of the shirt, you can crumple, twist, or scrunch it however you would like.

I went with the crumple method.

using hands to scrunch the edges of the shirt

Secure the rest of the shirt with rubber bands or zip ties.

holding a tied up white shirt with zip ties

Then soak it in a water and soda ash mixture for at least 20 minutes.

Follow the instructions on your kit, but it’s typically 1 cup of soda ash for 1 gallon of water. Make sure all of the soda ash is dissolved.

Then when you’re ready to dye the shirt, squeeze out the excess.

soaking the tied up shirt in a solution of soda ash and water

Prepare the Dye

Your kit may or may not come with orange and green so you’ll need to mix the colors. You can use an extra bottle if you have one or a cup (my go-to is yogurt containers). Add water to the bottles like normal and as your kit instructions say. Then you can mix the colors.

To make the orange dye, start with yellow and add a few drops of red at a time. To make it darker, add a drop or so of black.

To make the green dye, start with yellow and add a few drops of blue at a time. Again, if you want to make it darker, add a drop or so of black. Keep in mind, you won’t need very much green dye.

You can test the colors by putting a drop on a paper towel and seeing how it looks.

Dye the Tie Dye Pumpkin

When you’re happy with the color, put on some gloves and cover the area with plastic wrap.

Then use the squeeze bottle, eye dropper, or spoon to add orange dye to the pumpkin section of the shirt. It should be easy to identify from the orange marker and thread.

Be sure to flip it over and add dye to the other side. You can also push the dye into the shirt to make sure it’s fully saturated.

Tip: Make sure the whole area of the pumpkin is covered in orange. It’s okay if it spreads beyond that, except for the stem. Make sure orange doesn’t get on where the stem is.

pouring orange dye onto a tied up shirt

Next, add green dye to the stem. Again, give the fabric a pinch to help distribute the dye.

pouring green dye onto a tied up shirt to form the tie dye pumpkin

Once you have the the pumpkin and stem dyed, add black to the rest of the shirt.

Be very careful to not get the black on the pumpkin area. It’s therefore a good idea to wipe up your area with a paper towel.

squeezing black dye onto the side of a scrunched shirt

This is what it should look like completely dyed.

finished tie dye pumpkin shirt and starting to wrap it in plastic wrap

Wrap it all up in plastic wrap and let it set for at least 6 hours, but I recommend a full 24 hours.

Tip: When wrapping it, make sure the orange and green are not touching any of the black dye.

dyed shirt completely wrapped in plastic

Rinse and Enjoy!

After the time is up, rinse it in the sync with cool and then warmer water. Remove the ties, rubber bands, and clamps and continue rinsing until the water runs clear.

Then throw it in the washing machine with other tie dye clothes. Run it through the dryer and your tie dye pumpkin shirt is ready to wear!

Get the latest DIY tutorials, reviews, and crafting updates

You'll never be spammed and can unsubscribe at any time

finished tie dye pumpkin shirt with a pumpkin in the middle and black tie dye edges

More Tie Dye Projects and Halloween Crafts

Get the latest DIY tutorials, reviews, and crafting updates

You'll never be spammed and can unsubscribe at any time

top photo of a tie dye pumpkin shirt and the bottom photo is drawing half a pumpkin onto a folded shirt with the title "pumpkin tie dye"

Tie Dye Pumpkin Shirt

Learn how to make a tie dye pumpkin design on a shirt. Celebrate fall or Halloween with this unique pumpkin tie dye design.
Yield 1 Tie Dye Pumpkin Shirt
Project Time 30 minutes
Set Time 1 day
Total Time 1 day 30 minutes

Materials
  

  • 1 White Cotton Shirt
  • Washable Markers Orange and Green
  • 1 Needle and Thread
  • Rubber Bands or Zip Ties
  • 1 Small Clamp or Clothespin
  • 1 Tie Dye Kit or Tie-Dye Dye and Soda Ash
  • Water
  • 1 pair Rubber Gloves
  • Plastic Wrap
  • Paper Towels

Equipment

  • Bucket or Plastic Bin

Instructions
 

  • Fold the shirt in half and draw half of a pumpkin outline using a washable marker.
    1 White Cotton Shirt, Washable Markers
    using an orange washable marker to draw the outline of a pumpkin on a folded white shirt
  • If you want the pumpkin to have extra details, draw lines connecting the top and bottom.
    using an orange washable marker to draw the inside lines of a pumpkin on a folded white shirt
  • Use a green washable marker to draw half of a stem at the top.
    half of a pumpkin drawn on a folded white shirt as the template for a tie dye pumpkin
  • Use a needle and thread to do a basic running stitch around the outside of the pumpkin.
    1 Needle and Thread
    the outline of an pumpkin sewn with orange thread on a folded shirt
  • Sew along each line you drew in the body of the pumpkin.
    sewing the lines of the middle of a pumpkin on a folded shirt for a tie dye pumpkin design
  • Soak the shirt in water and squeeze out the excess.
    Then start with the middle stripes of the pumpkin and gently pull on the thread. This will create folds in the shirt.
    Water
    pulling on an orange thread to make folds in the shirt
  • Tie it off using the ends of the yarn.
    Repeat the process for the other stripe and the outline of the pumpkin.
    tying a knot with orange thread on the shirt to hold the folds in place
  • Fan fold along the stem line and place the clamp along the line.
    1 Small Clamp or Clothespin
    clamping the folded stem with a clamp
  • Crumple, twist, or scrunch the rest of the shirt however you'd like.
    using hands to scrunch the edges of the shirt
  • Secure it with rubber bands or zip ties
    Rubber Bands or Zip Ties
    holding a tied up white shirt with zip ties
  • Soak it in a soda ash mixture for at least 20 minutes.
    The ratio should be 1 cup soda ash to 1 gallon of water.
    soaking the tied up shirt in a solution of soda ash and water
  • Put on gloves and prepare the dyes according to the instructions. Mix the yellow and red to make orange. Mix yellow and blue to make green.
    Cover your area with plastic wrap and add the orange dye to the pumpkin section.
    1 Tie Dye Kit or Tie-Dye Dye and Soda Ash, Plastic Wrap, 1 pair Rubber Gloves
    pouring orange dye onto a tied up shirt
  • Add green dye to the stem.
    pouring green dye onto a tied up shirt to form the tie dye pumpkin
  • Add black to the rest of the shirt. Be careful to not get black on the orange or green parts. Use a paper towel to wipe up the black dye.
    Paper Towels
    squeezing black dye onto the side of a scrunched shirt
  • Wrap it all up in plastic wrap and let it set for at least 6 hours, but I recommend a full 24 hours.
    dyed shirt completely wrapped in plastic
  • Rinse it in the sink until the water runs clear. Then wash it in the washing machine with other tie dye clothes. Run it through the dryer and your tie dye pumpkin shirt is ready to wear!
    finished tie dye pumpkin shirt with a pumpkin in the middle and black tie dye edges
Keyword Clothing, Halloween, Pumpkin, Shirt, Tie Dye, Tie Dye Kit
Picture of Daniela Kretchmer

Daniela Kretchmer

Daniela is a lifelong crafter who loves to share her passion for crafting. Through classes or learning on her own, she likes to say she'll do pretty much any craft aside from scrapbooking. Her current personal obsessions include garden crafts, felting, and spinning yarn.

More Craft Projects and Ideas

Leave a Comment

Your email address will not be published. Required fields are marked *

Rating