Niddy Noddy Guide – How to Use a Niddy Noddy

hank of hand spun pink yarn while holding a 3d printed 2 yard niddy noddy over it with the title "how to use a niddy noddy"

Learn how to use a niddy noddy to not only make a hank of yarn, but also to measure the length of your yarn.

Table of Contents

Note: Some links in this post may contain affiliate links, which means at no cost to you, I may earn a commission.

What is a Niddy Noddy?

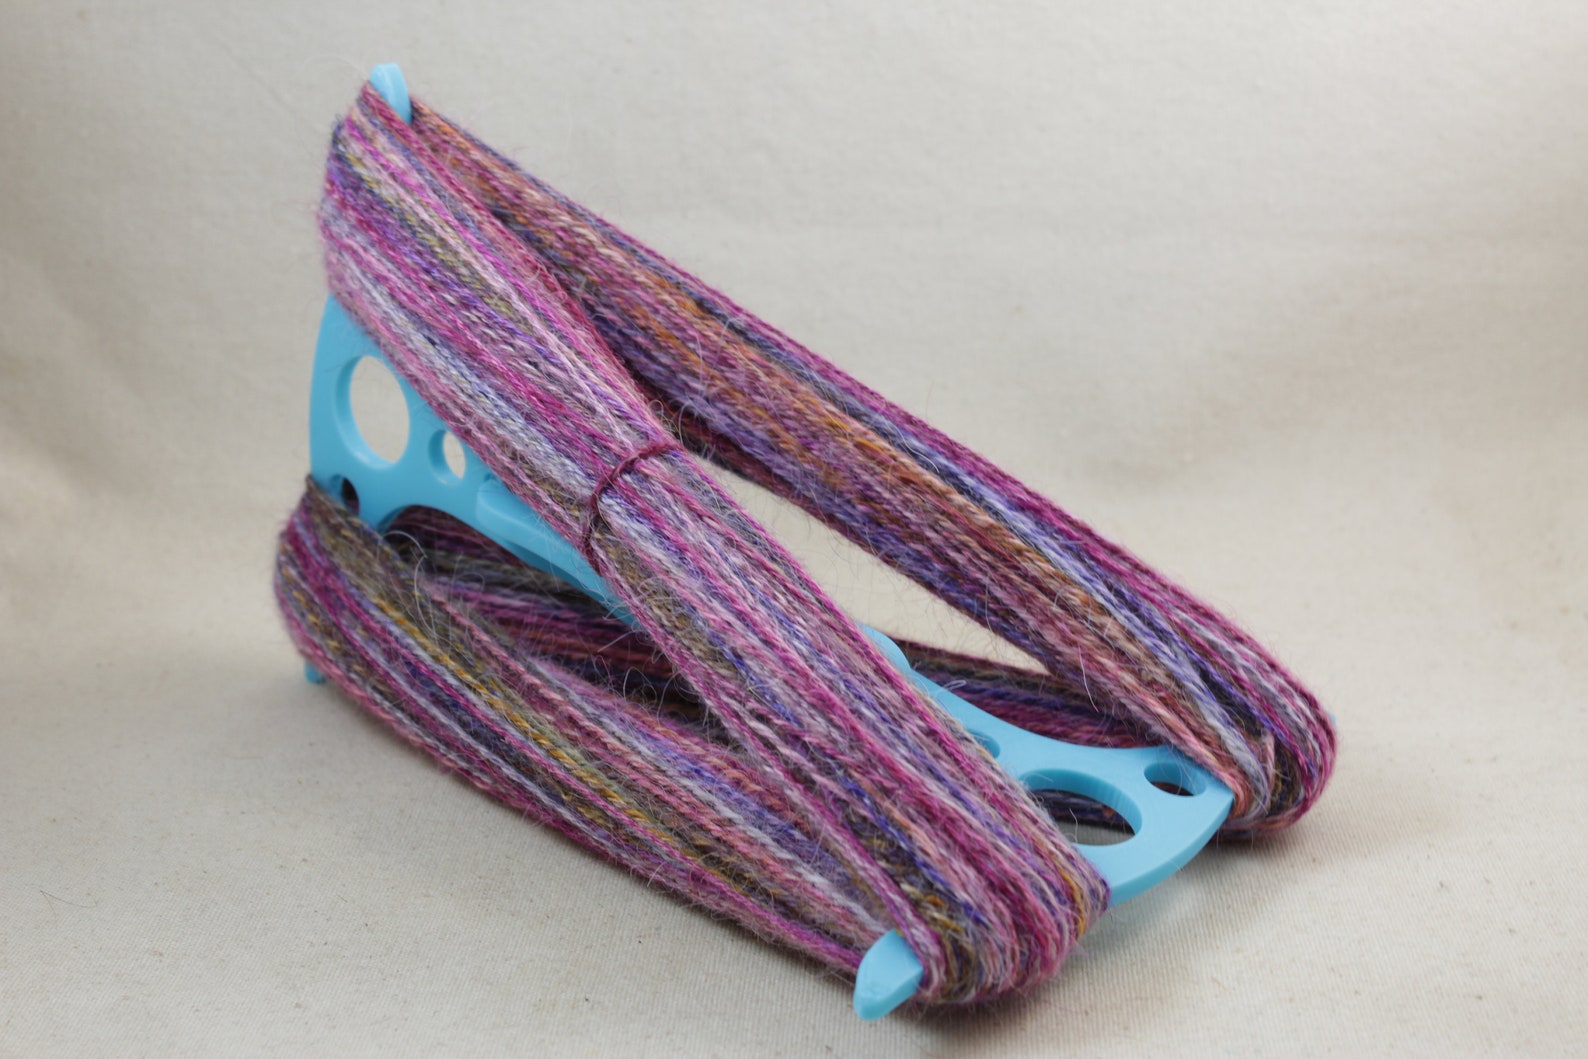
A niddy noddy is a tool to easily form a hank of yarn and count the length. The basic concept is you wrap your yarn around it in a way that gives you a neat circle (or hank) of yarn. The size of the tool also allows you to easily count the yardage of that yarn so you know how much you have for your yarn project.

Why Would You Use a Niddy Noddy?

I personally use one to either organize my yarn into a hank for storage or to wash it. Since I spin and dye my own yarn, the last step is wash it, but it would be difficult to wash it while it’s a ball or still on the wheel. Therefore I use a niddy noddy to turn the yarn into a hank, which gives me a tidy loop to work with. I personally can’t recommend them enough! I even added them to my list of the best knitting and crochet gifts.

Another time you would use one is if you want to measure your yarn. Typically you’ll find 1 or 2 yard niddy noddies. They’re named this because one full loop will either be 1 or 2 yards.

Get the latest DIY tutorials, reviews, and crafting updates

You'll never be spammed and can unsubscribe at any time

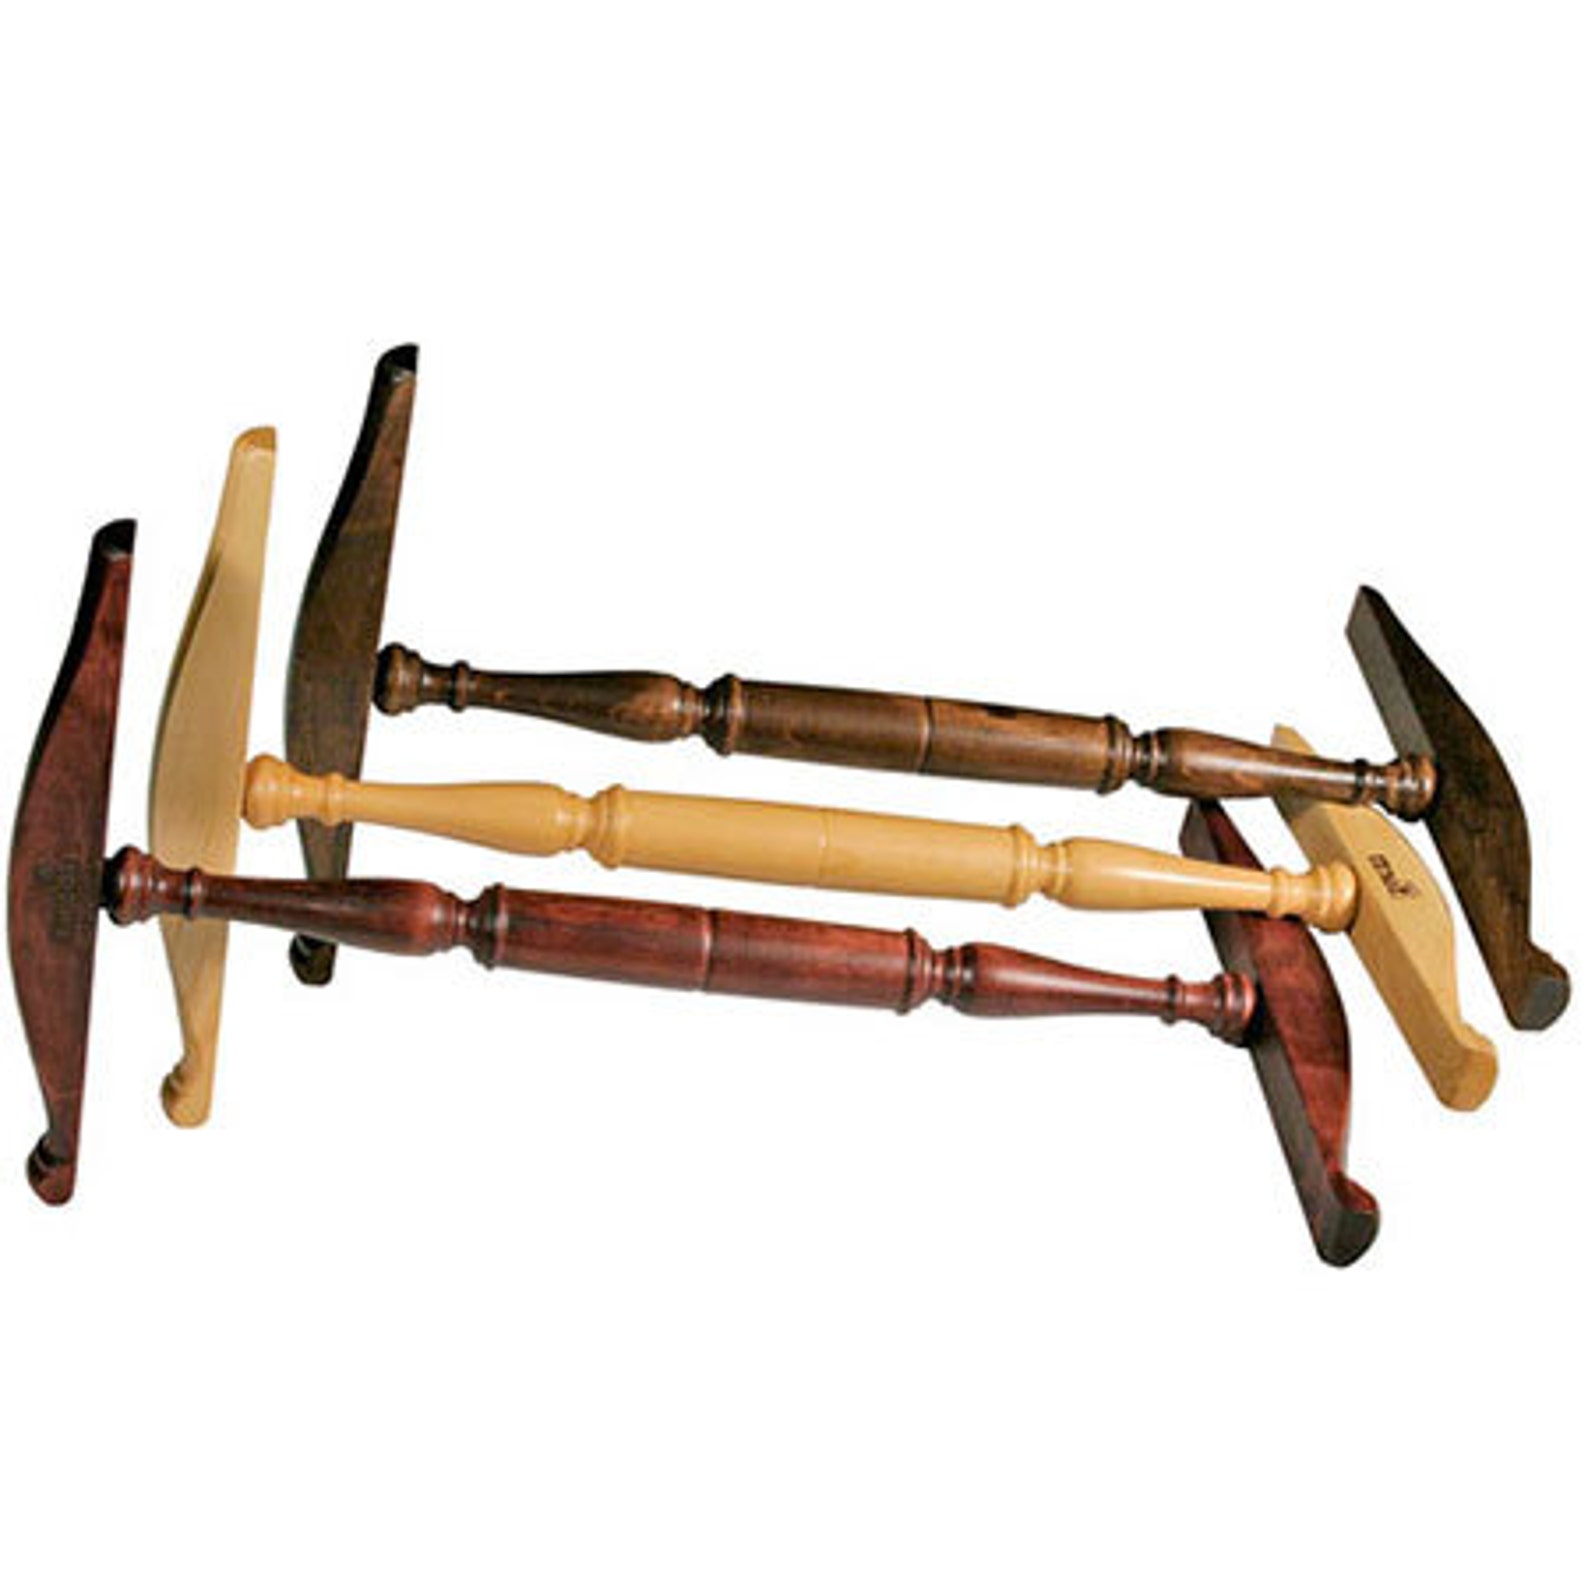
Types of Niddy Noddies

There are different types of niddy noddies, but they’re all pretty much shaped the same way and serve the same purpose. Therefore it’s more about your preference. For myself, I’m all about space-saving and portability so I have a very small one. Others make their own using PVC pipe.

3D Printed

If you have your own 3D printer, you can print your own using these files. This would definitely be the route I recommend if you can do it.

1 Yard

If not, no problem, you can find them all over Etsy, like this one from KnitInTheMittYarns. I ended up getting mine on Etsy probably 2 weeks before my boyfriend decided to get his 3D printer (womp!).

It’s a 1 yard niddy noddy, but you can also get it with or without the extender. I personally got my extender separately, thinking I would rarely use it. Turns out, I mostly use it with the extender. So if you’re thinking of getting one, I recommend also getting the extender to have more options.

2 Yards

For example, this one from LEPrintworks on Etsy comes with the 2 yard extenders.

Wooden Niddy Noddy

top photo is a hank of hand spun pink yarn while holding a 3d printed 2 yard niddy noddy over it and the bottom photo is diving the yarn in two with the title "how to use a niddy noddy"

Steps to Use a Niddy Noddy to Make a Hank of Yarn

Assembling a 3D Printed Niddy Noddy

In this example I’m using the 3D printed niddy noddy that I purchased off of Etsy. You can see it comes in two pieces, plus I also have extenders to make it a 2 yard niddy noddy (which I also got on Etsy).

parts of a 3d printed niddy noddy separated on the table next to a ball of pink yarn and a ceramic yarn bowl

If you use a 3D printed one, the first step is to connect the two halves.

You’ll see I added tape to one side as I felt as though they were two loose and I wanted a more snug connection.

If you want to use the 2 yard extender, you simply connect those together and connected these ends to it.

putting the two sides of a 3d printed niddy noddy together

Winding the Yarn Around the Niddy Noddy

Start by holding the end of the yarn across the middle of the niddy noddy. You’ll want to keep holding the yarn so that it doesn’t move.

Then bring the yarn over one of the ends on the closest side.

Note: I like to hold it with my dominant hand and the yarn with my left.

Tip: Use a yarn bowl to hold your ball of yarn (these are some great options and you can also check out my recommendations for the best yarn bowls).

holding the end of pink yarn in the middle of a 3d printed niddy noddy

Twist your hand so the “T” is upright and the yarn is coming towards you.

Note: Since I’m right-handed, you’d likely do the opposite if you’re left handed.

wrapping pink yarn around the top left corner of a niddy noddy

Then bring the yarn down and wrap it under the other end that is sticking out towards you.

Get the latest DIY tutorials, reviews, and crafting updates

You'll never be spammed and can unsubscribe at any time

wrapping pink yarn around the bottom left corner of a niddy noddy

Then bring the yarn up and over the other side of the “T” on to opposite end.

The yarn should form a “V” shape.

wrapping pink yarn around the top right corner of a niddy noddy

With the niddy noddy upright, bring the yarn down behind it and wrap under the remaining end on the opposite side.

wrapping pink yarn around the bottom left corner of a niddy noddy

Then back up to the start of the T. This will complete the first loop of the yarn.

wrapping yarn back around to the beginning of the 3d printed niddy noddy while holding the middle

Simply continue in this pattern until you’ve wrapped all of the yarn. It will definitely take a few times of practice, but once you get it, it’s incredibly easy to use!

Tip: I find it can be helpful to move my wrist from side to side and front and back slightly, but I keep the niddy noddy facing me.

Note: After a few wraps around, if you’d like, you can release the starting yarn.

pink yarn wrapped multiple times around a plastic 3d printed niddy noddy

Adding Extenders to Make a 2 Yard Niddy Noddy

If you have more yarn, it may make sense to use a larger 2 yard niddy noddy. For the 3D printed ones, you can get extenders (such as this one) that you first connect together.

connecting the 2 yard niddy noddy extender

Then add the main pieces to the ends.

I tend to use the 2 yard one more often than the 1 yard one since I’ll typically spin yarn that’s more than 50 yards. When it’s more than 50 yards, the twisted hank looks too bulky and it’s difficult for me to see the colors in it.

holding a 3d printed 2 yard niddy noddy

How to Measure the Length of Your Yarn

A niddy noddy makes it easy to count the length of your yarn. After you’ve wrapped the yarn around it, simply count the number of strands on one side.

For a 1 yard niddy noddy, the length is simply the number of strands. For example, if you have 10 strands, you have 10 yards of yarn.

For a 2 yard niddy noddy, you want to multiply the number of strands by 2. For example, if you have 10 strands, you have 20 yards of yarn.

counting pink yarn by separating it with fingers

How to Make a Hank of Yarn

After you’ve wrapped all of your yarn and counted your strands, divide the strands on one side in half.

dividing the pink yarn in two sections

Use one of the yarn ends to wrap around one of the halves.

wrapping the end of the pink yarn around half of the yarn strands

Then wrap the end around the other half and tie it into a knot.

Dividing the yarn in half will help keep the yarn from tangling.

Repeat this on the other side that has the other yarn end.

tying the end of yarn in a knot around the strands of yarn

For the 2 remaining sides, use a scrap piece of yarn to divide the sections. Therefore each side will be divided and tied.

Note: Sometimes the yarn ends will be on the same side. The goal is tie each section so if both are one one side, they can either be tied together or separately, but you’ll still want to tie off the other 3 sections.

tying a brown piece of yarn around a section of the pink yarn

After you’ve tied off the sections, you can slide the yarn off.

removing the wrapped yarn from the niddy noddy by sliding it over one corner
holding a 3d printed 2 yard niddy noddy over a hank of pink yarn

Then grab each end and twist in opposite directions to create a twist in the yarn.

twisting a hank of pink yarn

Fold it in half.

Tip: You can use your chin to hold onto the middle part of the yarn to make it easier to fold it in half.

folding a twisted hank of pink yarn in half

Then let go of the folded side, while still holding onto the ends. The yarn will twist itself into a twisted skein!

letting go of a twisted hank of pink yarn to form a twisted hank of yarn

Then simply open up one of the ends and push the other end through it to secure.

opening the end of yarn to show a hole
pushing the other end of the hank of yarn through the hole made by the other end

Then you’ll have a measured twisted hank! I like to include a tag on it that has the yardage and wraps per inch so I can reference it later.

Get the latest DIY tutorials, reviews, and crafting updates

You'll never be spammed and can unsubscribe at any time

finished twisted hank of handspun pink yarn

More Yarn Related Projects and Posts

Get the latest DIY tutorials, reviews, and crafting updates

You'll never be spammed and can unsubscribe at any time

top photo is a hank of hand spun pink yarn while holding a 3d printed 2 yard niddy noddy over it and the bottom photo is diving the yarn in two with the title "how to use a niddy noddy"

How to Use a Niddy Noddy

Learn how to use a niddy noddy to not only make a hank of yarn, but also to measure the length of your yarn.
Yield 1 Twisted Hank of Yarn
Prep Time 5 minutes
Total Time 5 minutes

Materials
  

  • 1 Niddy Noddy
  • 1 Ball of Yarn
  • 2-4 pieces Scrap Yarn

Instructions
 

Winding the Yarn Around the Niddy Noddy

  • Hold the end of the yarn across the middle of the niddy noddy.
    1 Ball of Yarn, 1 Niddy Noddy
    holding the end of pink yarn in the middle of a 3d printed niddy noddy
  • Then wrap the yarn over one of the ends on the closest side.
    wrapping pink yarn around the top left corner of a niddy noddy
  • Twist your hand so the “T” of the niddy noddy is upright and the yarn is coming towards you. Then wrap the yarn down and under the other end that is sticking out towards you.
    wrapping pink yarn around the bottom left corner of a niddy noddy
  • Then wrap the yarn up and over the other side of the “T” on to opposite end.
    wrapping pink yarn around the top right corner of a niddy noddy
  • With the niddy noddy upright, wrap the yarn down behind it and under the remaining end on the opposite side.
    wrapping pink yarn around the bottom left corner of a niddy noddy
  • Then bring it back up to the start of the T. This will complete the first loop of the yarn.
    wrapping yarn back around to the beginning of the 3d printed niddy noddy while holding the middle
  • Continue in this pattern until you’ve wrapped all of the yarn around.
    pink yarn wrapped multiple times around a plastic 3d printed niddy noddy

Measuring the Length of Yarn

  • After you’ve wrapped the yarn around it, simply count the number of strands on one side.
    For a 1 yard niddy noddy, the length is simply the number of strands. For example, if you have 10 strands, you have 10 yards of yarn.
    For a 2 yard niddy noddy, you want to multiply the number of strands by 2. For example, if you have 10 strands, you have 20 yards of yarn.
    counting pink yarn by separating it with fingers

Making a Twisted Hank of Yarn

  • Divide the strands on one side in half.
    dividing the pink yarn in two sections
  • Use one of the yarn ends to wrap around one of the halves. Then wrap the end around the other half and tie it into a knot. Repeat this on the other side that has the other yarn end.
    wrapping the end of the pink yarn around half of the yarn strands
  • For the 2 remaining sides, use a scrap piece of yarn to divide and tie the sections
    2-4 pieces Scrap Yarn
    tying a brown piece of yarn around a section of the pink yarn
  • Slide the yarn off of the niddy noddy.
    removing the wrapped yarn from the niddy noddy by sliding it over one corner
  • Grab each end and twist in opposite directions to create a twist in the yarn.
    twisting a hank of pink yarn
  • Fold it in half.
    folding a twisted hank of pink yarn in half
  • Let go of the folded side, while still holding onto the ends. The yarn will twist itself into a twisted skein!
    letting go of a twisted hank of pink yarn to form a twisted hank of yarn
  • Open up one of the ends and push the other end through it to secure.
    pushing the other end of the hank of yarn through the hole made by the other end
  • Then your twisted hank is complete!
    finished twisted hank of handspun pink yarn
Keyword Niddy Noddy, Yarn
Picture of Daniela Kretchmer

Daniela Kretchmer

Daniela is a lifelong crafter who loves to share her passion for crafting. Through classes or learning on her own, she likes to say she'll do pretty much any craft aside from scrapbooking. Her current personal obsessions include garden crafts, felting, and spinning yarn.

More Craft Projects and Ideas

Leave a Comment

Your email address will not be published. Required fields are marked *

Rating