How to Make Yarn Pom Poms

different colored yarn pom poms of different sizes with the title "yarn pom poms"

Easily learn how to make yarn pom poms in just a few minutes! Learn different ways with and without a pom pom maker.

Note: Some links in this post may contain affiliate links, which means at no cost to you, I may earn a commission.

Table of Contents

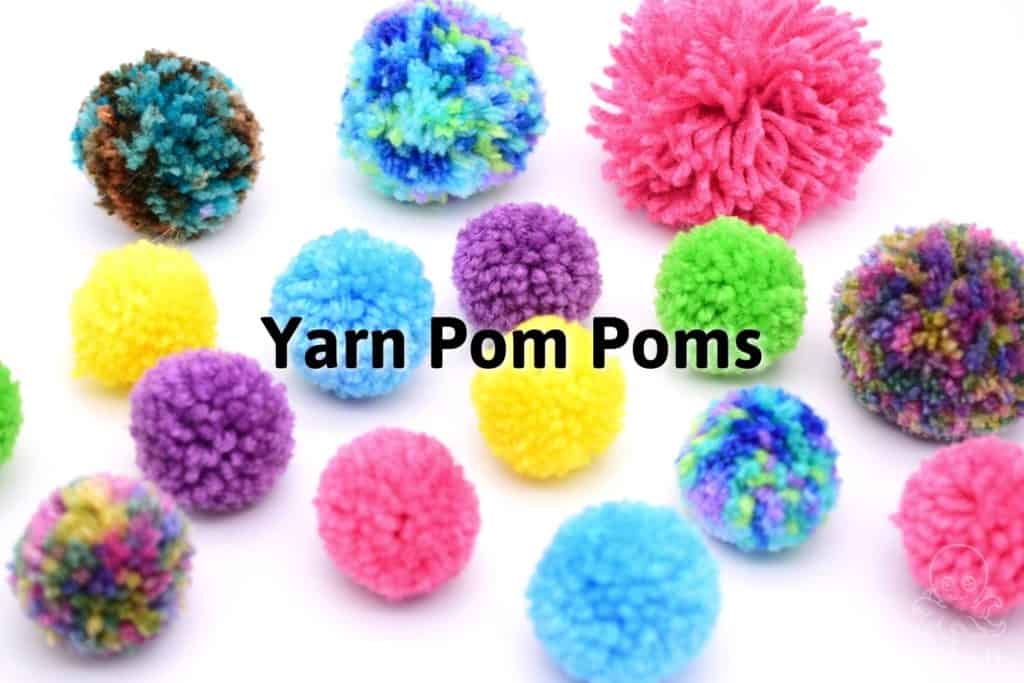
Pom poms are so much fun and easy to make – I used to make them all the time when I was a kid. Now I’ll make them for other projects, such as my loom knit hat or knitting machine hat. The process is very meditative and only takes a few minutes.

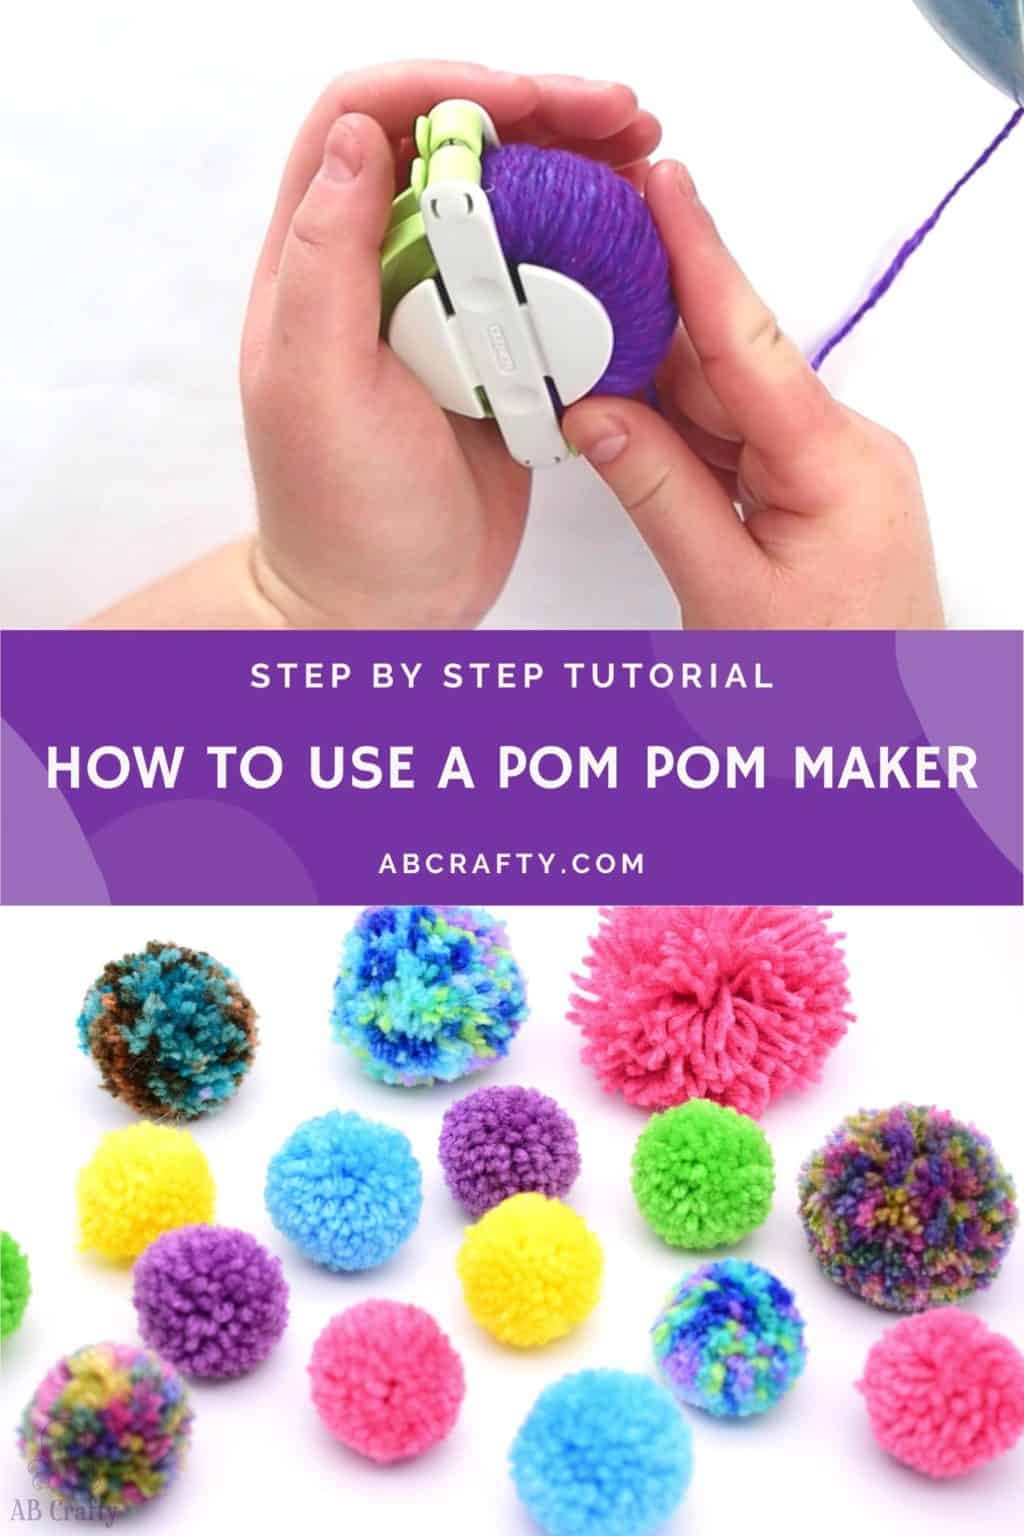
Now you don’t need a pom pom maker to make these, but I highly recommend it. This is the set I have and I wish I had gotten it sooner. You can use cardboard if you don’t want to commit or even the foam discs from foam disc launchers (this is what I primarily used as a kid).

Get the latest DIY tutorials, reviews, and crafting updates

You'll never be spammed and can unsubscribe at any time

Don’t forget to pin it so you can easily come back to it later!

different colored yarn pom poms of different sizes with the title "how to make yarn pom poms"

Why Use a Pom Pom Maker?

The advantage to using an actual pom pom maker like these is they’re reusable, come in different sizes, and make it super easy to make yarn pom poms.

That being said, they’re not required to make them – you can make your own using items such as cardboard or foam discs.

top image is a pom pom maker half filled with yarn and the bottom is different colored yarn pom poms. the title says "step by step tutorial, how to use a pom pom maker, abcrafty.com"

Materials to Make Pom Poms with a Pom Pom Maker

How to Make Yarn Pom Poms with a Pom Pom Maker

Choose Your Pom Pom Maker Size

Pom pom makers come in several sizes so choose the one you want for your project. This is why I recommend getting set like the one I have so you have several from which to choose.

Tip: As a rough estimate, you can expect your finished pom pom to be slightly larger than the colored part of the maker.

holding a green clover pom pom maker

Wrap Half of the Pom Pom Maker

Start by opening half of the pom pom maker. Do so by pushing on the tabs of the colored part of the maker so that you have one side completely open with a top and bottom part.

Make sure the top and bottom are aligned and wrap the yarn around both parts, crossing it over the first wrap to secure the end of the yarn.

wrapping purple yarn around one side of a green clover pom pom maker
securing the yarn by wrapping it over itself

Continue to wrap the yarn around, filling it in evenly. After you have the first layer, add additional layers on top.

Tip: For the first row, keep the yarn a little loose. As you add additional rows you can make it tighter. This will help the yarn be more similar in length (otherwise the bottom yarn will be much shorter than the top layers).

Tip #2: Push the yarn to one side as you wrap to fit in more loops. 

wrapping multiple rounds of purple yarn on one side

Continue wrapping until you’ve filled up the side. You can test it by closing the pom pom maker. It should still be able to close.

If there are gaps, wrap more yarn around in those places to fill them in.

(By the way, the thing in the top right is a yarn bowl so my ball of yarn doesn’t roll away. I highly recommend them – these are great options).

half of the green clover pom pom maker filled with purple yarn

Get the latest DIY tutorials, reviews, and crafting updates

You'll never be spammed and can unsubscribe at any time

Finish the Pom Pom

When you’re happy with the first half, cut the yarn and repeat on the other half of the pom pom maker.

wrapping the other side with yarn

With both halves closed, use the scissors to cut the yarn between the top and bottom colored parts. Repeat on the other half.

Tip: It’s easiest to cut the yarn in layers, starting with the top layer and moving down. Then move to the next section.

Tip #2: Be careful holding the pom pom maker so that the halves don’t come apart.

cutting the yarn with scissors down the middle

Next, cut a longer piece of yarn and wrap it around the pom pom maker, between the top and bottom colored parts. Pull it tight and tie it in a knot.

I personally like to wrap it around a second time and tie it off to make sure it’s extra secure.

pulling a long strand of purple yarn to tighten

Then pull the tabs of the colored parts of the maker to open both halves.

Holding each half, separate the pom pom maker to release the pom pom.

removing the halves of the pom pom maker

Lastly, clean up your yarn pom pom by trimming it to make sure it’s perfectly round.

Tip: If you’re going to attach it to a hat, leave the ties as those will be used to attach it to the beanie. You can see how in the loom knit hat tutorial.

trimming the longer threads of the purple pom pom with scissors

Your yarn pom pom is now ready to use!

If you make your own pom poms, I’d love to see them! Tag me on Instagram @ab.crafty!

Get the latest DIY tutorials, reviews, and crafting updates

You'll never be spammed and can unsubscribe at any time

holding a finished purple pom pom with the tied ends hanging down

And here’s how it looks on the loom knit hat.

finished blue and purple loom knit hat with a double brim and purple pom pom

And here are a bunch more that I’ve made. The multiple colored ones can be made using different colors of yarn or yarn that changes colors on its own like this one.

different colored yarn pom poms of different sizes

How to Make Pom Poms without a Pom Pom Maker

You can absolutely make them without a maker. The way to do it is by using either cardboard or foam discs from disc launchers (like these).

If using cardboard, cut two discs of cardboard and make a single cut through it from the outside to the center. If using foam discs, take two and simply make the same cut.

Then stack the two on top of each other and follow the regular instructions. The only difference is there isn’t a convenient way to separate the halves. This is where the slit comes into play though – push the yarn out of the discs through the slit after tying it off.

Tip: Rather than throw away the cardboard after using it, upcycle it into a fun toy for a pet! For example, cardboard pieces are on this hamster supplies list as a great chew toy.

foam discs from a foam disc launcher

More Yarn Crafts and Inspiration

Get the latest DIY tutorials, reviews, and crafting updates

You'll never be spammed and can unsubscribe at any time

different colored yarn pom poms of different sizes with the title "how to make yarn pom poms"

How to Make Yarn Pom Poms

Easily learn how to make yarn pom poms with a pom pom maker in just a few minutes!
Yield 1 pom pom
Project Time 5 minutes
Total Time 5 minutes

Materials
  

  • Yarn

Equipment

  • 1 Pom Pom Maker
  • 1 Pair of Scissors
  • 1 Yarn Bowl optional

Instructions
 

  • Start by opening half of the pom pom maker (this is the set I have). Wrap the yarn around both colored parts, crossing it over the first wrap to secure the end of the yarn.
    Yarn
    securing the yarn by wrapping it over itself
  • Continue wrapping around, pushing the wrapping to one side to fit more in. Once the first layer is filled, continue wrapping on top. Keep the layers even.
    wrapping multiple rounds of purple yarn on one side
  • Continue wrapping until you’ve filled up the side. You should be able to close it and there aren't gaps.
    half of the green clover pom pom maker filled with purple yarn
  • Repeat the process on the other half.
    wrapping the other side with yarn
  • Cut the yarn between the top and bottom colored parts. Repeat on the other half.
    cutting the yarn with scissors down the middle
  • Cut a longer piece of yarn and wrap it around the middle of the pom pom maker, between the top and bottom colored parts. Pull it tight and tie it in a knot.
    pulling a long strand of purple yarn to tighten
  • Pull the tabs of the colored parts of the maker to open both halves.
    Holding each half, separate the pom pom maker to release the pom pom.
    removing the halves of the pom pom maker
  • Trim the pom pom so it's perfectly round.
    trimming the longer threads of the purple pom pom with scissors
  • If you're attaching it to a hat, leave the tails. Now your pom pom is ready to use!
    holding a finished purple pom pom with the tied ends hanging down

Notes

Tip: For the first row, keep the yarn a little loose. As you add additional rows you can make it tighter. This will help the yarn be more similar in length (otherwise the bottom yarn will be much shorter than the top layers).
Tip #2: Push the yarn to one side as you wrap to fit in more loops.
Tip #3: Use a yarn bowl to keep your yarn from rolling around (these are great options).
Keyword Pom pom, Pom Pom Maker, Yarn
Picture of Daniela Kretchmer

Daniela Kretchmer

Daniela is a lifelong crafter who loves to share her passion for crafting. Through classes or learning on her own, she likes to say she'll do pretty much any craft aside from scrapbooking. Her current personal obsessions include garden crafts, felting, and spinning yarn.

More Craft Projects and Ideas

Leave a Comment

Your email address will not be published. Required fields are marked *

Rating