Diamond Painting 101: Beginner’s Guide to Gem Art

adding a green diamond to a hulk diamond painting sticker kit with the title "diamond painting 101"

This guide to diamond painting provides all the information you need to get started, including different techniques and how to use various diamond painting tools.

Table of Contents

I had seen diamond painting kits in craft stores and in social ads, but hadn’t paid much attention to it. I’m not sure why, but I regret not trying it out sooner as I’m officially obsessed! If you haven’t tried it, I cannot recommend it enough – it’s a meditative activity that creates a fun shimmering piece of art in the end.

There are a bunch of different styles to choose from, but all follow the same basic principles I lay out here. So if you want to get started with diamond painting, or just curious about what it is, keep reading! I’ll cover everything you need to know – the tools you will need, how to do diamond painting step by step, and some tips and tricks along the way.

Note: Some links in this post may contain affiliate links, which means at no cost to you, I may earn a commission.

Get the latest DIY tutorials, reviews, and crafting updates

You'll never be spammed and can unsubscribe at any time

using the wider tool to place multiple diamonds at once

What is Diamond Painting?

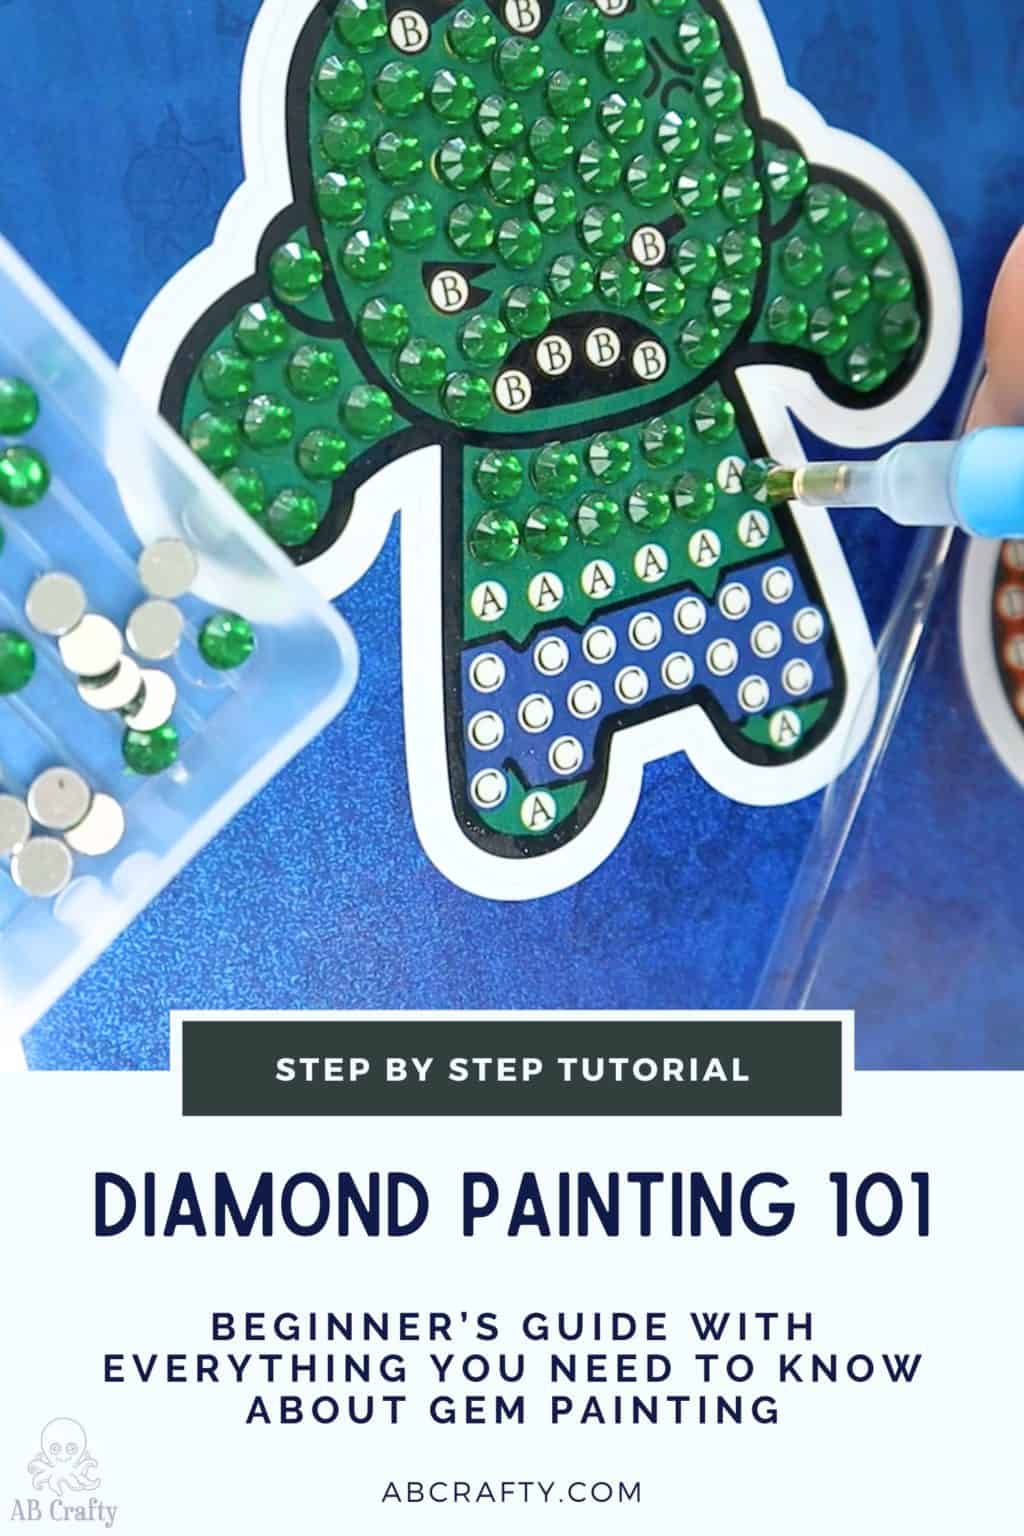
Diamond painting is a type of craft that combines the concept of paint-by-numbers and mosaics. It involves placing tiny plastic “diamonds” onto a numbered and color-coded adhesive canvas. The plastic “diamonds” are cut in a way that make them appear to shimmer, hence the name “diamond” painting.

It can also be referred to as gem painting, diamond art, and diamond dotz. However, since it does not involve painting nor diamonds, a better and more accurate name would be something like shimmer mosaic by numbers.

This popular craft offers a unique blend of creativity and relaxation, providing crafters with a therapeutic way to unwind while creating beautiful pieces of artwork.

Don’t forget to pin it so you can easily come back to it later!

adding a green diamond to a hulk diamond painting sticker kit with the title 'step by step tutorial - diamond painting 101, abcrafty.com'

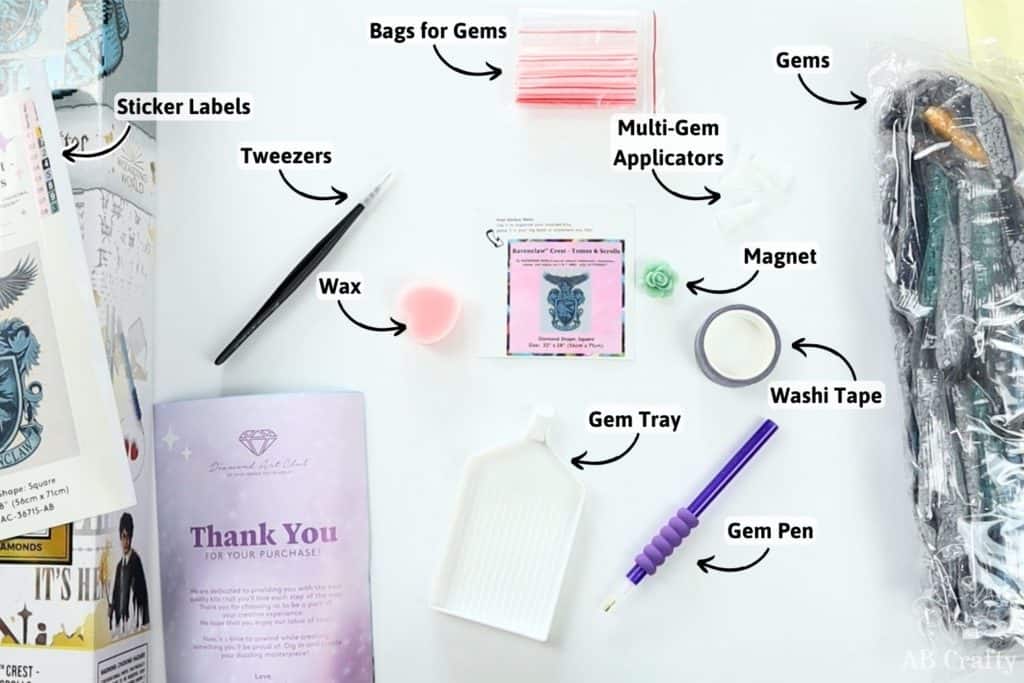
Materials Needed for Diamond Painting

Most get started with diamond painting using a diamond painting kit. However, you can create your own designs and get individual colors if you’d like so I’ve linked to those below. I personally have only ever used kits so that’s what I’m going to focus on. In all kits you’ll find the following:

Then, depending on the kit you may additionally find the following:

  • Bags for the gems (Amazon)
  • Tweezers
  • Multi-gem applicators (Amazon)
  • Magnet
  • Parchment paper
  • Sticker labels
materials from a diamond painting kit

Where to Buy Diamond Painting Kits

Video Example

This is the kit I used in the video if you want the same one.

How to Do Diamond Painting

Organize the Gems

The first thing you want to do when you get your kit is organize the gems if they’re not yet organized. The example I’ll be using is this Ravenclaw kit from Diamond Art Club.

Each color has a number associated with it so separate them out into each number.

sorted diamonds into the different colors

Then use the provided bags to pour each color into its own bag.

And if you use a Diamond Art Club kit, some come with stickers so you can label them for easy reference.

Tip: If your kit does not come with labels, cut out the number from one of the packages and include it in the bag.

yellow diamonds in a bag with the sticker label

In some cases, the bags provided will not fit all of the colors so I like to use ziplock bags if necessary.

sorted diamonds into their respective bags

In some kits, like the kits from Home Craftology, the colors are already separated into their own bags making it super easy. The one I got is this cute mushroom house kit.

diamond painting kit with pre-sorted diamond colors

In some cases, you might get gems that aren’t the basic gem shape at all, such as with this Halloween keychain set. You’ll see this one also came with pearl-like gems.

adding a pearl to a ghost diamond painting kit

Get the latest DIY tutorials, reviews, and crafting updates

You'll never be spammed and can unsubscribe at any time

Prepare the Tool

Each kit will come with wax and diamond painting tool. Typically there will be a plastic coating to the wax so you want to peel it back and then insert the tip of the tool all the way through the wax. This will allow you to easily pick up the gems.

You can then set the tool aside.

dipping the tool into red wax in the shape of a heart

Select the Color

All diamond paintings work like a paint by number, meaning each square or circle on the canvas has a number or symbol (and color) associated with it. There will also likely be a reference key on the side that shows what gem color this number corresponds to.

Note: In some cases the number may match the gem color, but often times that’s not the case.

pointing to the color key on the side of the kit

Reference the section you want to start with and then pour some gems of that color into the trey. In my case I wanted to start in the bottom left corner so I selected the gem color associated with “2.”

Then peel back the plastic of the section you’re going to work on and use the tool to gently pick up one of the gems.

Tip: Give the gems a shake in the trey so they spread out and settle, making them easier to pick up.

Get the latest DIY tutorials, reviews, and crafting updates

You'll never be spammed and can unsubscribe at any time

using the diamond painting tool to pick up gray diamonds from the tray

You’ll see when you pick up a gem, the flat side will be on the bottom while the tool is touching the shaped (faceted) side.

holding the tool with a grey diamond at the end

Then simply place the gem into the corresponding spot. Then repeat the process for each square.

Now in the case of these larger paintings, going one at a time when you’re working with a single color like this can be a pain, so there are easier ways to go about it.

using the tool to place a diamond onto the painting

That’s when the attachments come in! You can place them onto the other side of the diamond painting tool and they allow you to pick up multiple gems at once.

Typically they come in sizes from 3-8 gems so you can change them out depending on the section you’re working on. I personally leave the largest one on as I don’t want to continuously change out the attachments.

switching the tool for a wider tip

But the attachment works the same way – dip it into the wax and then select a row of gems.

Note: When using an attachment, it’s important the gems are clumped nicely together in the tray without any gaps.

using the wider tool to pick up multiple diamonds

After placing the row, you can use tweezers or the single end of the tool to adjust the gems to make sure they’re in the right place.

using the wider tool to place multiple diamonds at once

In some cases, however, you might not be able to use the multi-tool. For example with these Marvel stickers, they’re not in a perfect line nor are they evenly spaced. Therefore you might have do them one gem at a time.

adding a green diamond to a hulk diamond painting sticker kit

Get the latest DIY tutorials, reviews, and crafting updates

You'll never be spammed and can unsubscribe at any time

Diamond Painting Tips and Tricks

Let’s dive into some handy tips and tricks to enhance your diamond painting experience.

Use parchment paper to section off areas

A neat trick to help keep you focused and ensure areas you’re not working on will stay sticky is to use parchment paper. After peeling back the plastic, place the parchment paper on the exposed area that you’re not actively working on.

peeling back the edge of a kit and using parchment paper to cover it
using a tool to place a circular diamond

Use magnets to hold the plastic

Some kits will come with a set of magnets to hold back the plastic. Put a magnet on the back of the canvas and the other on the top to keep the plastic out of your way.

Use a roller to secure the gems

To ensure the gems are all down and stuck firmly to the canvas, you can use a roller like this one to push them down. I also will also brush my hand along the surface to see if I can feel any raised gems and go in with the gem tool and push them into place.

Work in sections

To avoid mixing up gem colors and keeping things organized, work in sections instead of bouncing around the canvas. This will also help you stay focused on one area at a time and make sure all gems are placed correctly.

Get the latest DIY tutorials, reviews, and crafting updates

You'll never be spammed and can unsubscribe at any time

Frequently Asked Questions

What's the best way to store my diamond painting supplies?

The best way to store your diamond painting supplies is by using clear plastic storage containers or ziplock bags. This will keep your gems and tools organized and prevent them from getting lost or mixed up. You can also label the containers for easy identification.

How do I prevent my canvas from getting creased?

To prevent creases on your canvas, you can roll it up instead of folding it. Use a large tube or even a wrapping paper roll to gently roll the canvas around. You can also place heavy books on top of the rolled up canvas to flatten it out.

What do I do if I make a mistake on the diamond painting?

If you make a mistake on your diamond painting, don’t worry! You can gently remove the misplaced gem with tweezers and replace it with the correct one. If the adhesive has lost its stickiness, you can use a small dot of glue to secure the new gem in place. Alternatively, some kits come with extra gems in case of mistakes or loss during the process.

How long does it take to complete a diamond painting?

The time it takes to complete a diamond painting varies depending on the size and complexity of the design, as well as your own pace. For example, small projects such as coasters or keychains take me about 30 minutes. However, the large canvases such as the Ravenclaw one was over several months, working on it for an hour or so at a time. The key is to enjoy the process!

More Crafts to Try

Get the latest DIY tutorials, reviews, and crafting updates

You'll never be spammed and can unsubscribe at any time

adding a green diamond to a hulk diamond painting sticker kit with the title 'step by step tutorial - diamond painting 101, abcrafty.com'

Diamond Painting 101

Learn how to complete a beautiful diamond painting.
Yield 1 diamond painting
Project Time 5 minutes
Total Time 5 minutes

Materials
  

  • Diamond Painting Kit

Instructions
 

  • Organize the gems by their associated number and pour each color into its own bag for easy access. If the kit comes with stickers, label each bag for quick reference. Use ziplock bags if necessary.
    sorted diamonds into their respective bags
  • Prepare your diamond painting tool by peeling back the plastic coating on the wax and inserting the tool's tip through the wax. This will enable you to pick up gems easily.
    dipping the tool into red wax in the shape of a heart
  • Choose a color to start with and refer to the canvas or key to find the corresponding number or symbol. Pour some gems of the selected color into the tray.
    using the diamond painting tool to pick up gray diamonds from the tray
  • Peel back the plastic on the section you're working on, pick up a gem using the tool, and place it onto the corresponding spot on the canvas. Repeat this process for each square.
    using the tool to place a diamond onto the painting
Keyword Crystal, Diamond Painting
Picture of Daniela Kretchmer

Daniela Kretchmer

Daniela is a lifelong crafter who loves to share her passion for crafting. Through classes or learning on her own, she likes to say she'll do pretty much any craft aside from scrapbooking. Her current personal obsessions include garden crafts, felting, and spinning yarn.

More Craft Projects and Ideas

Leave a Comment

Your email address will not be published. Required fields are marked *

Rating