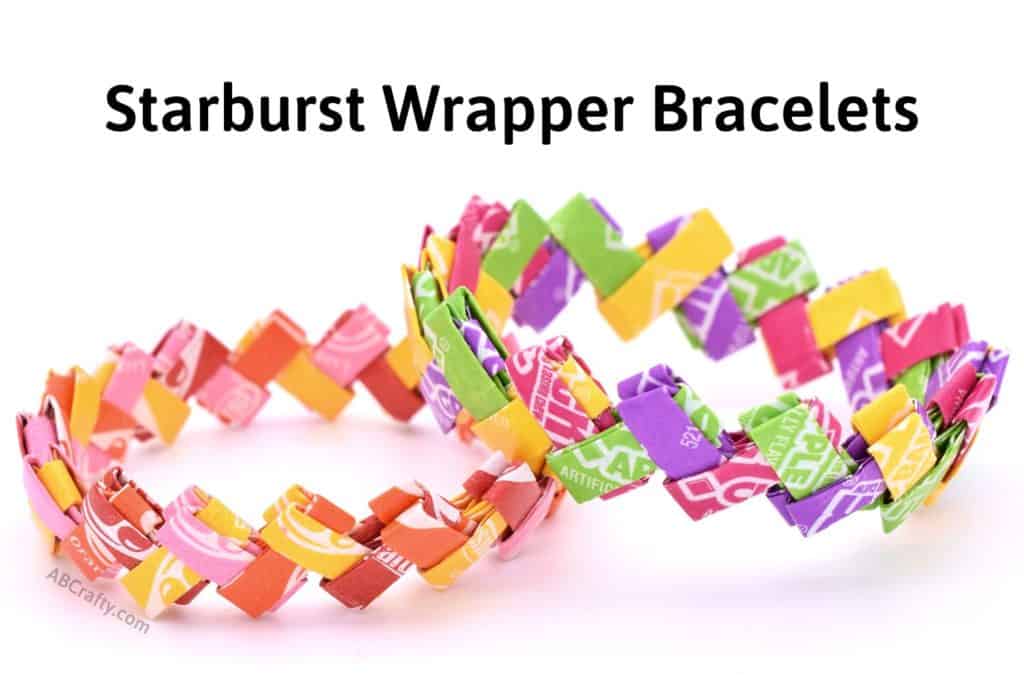
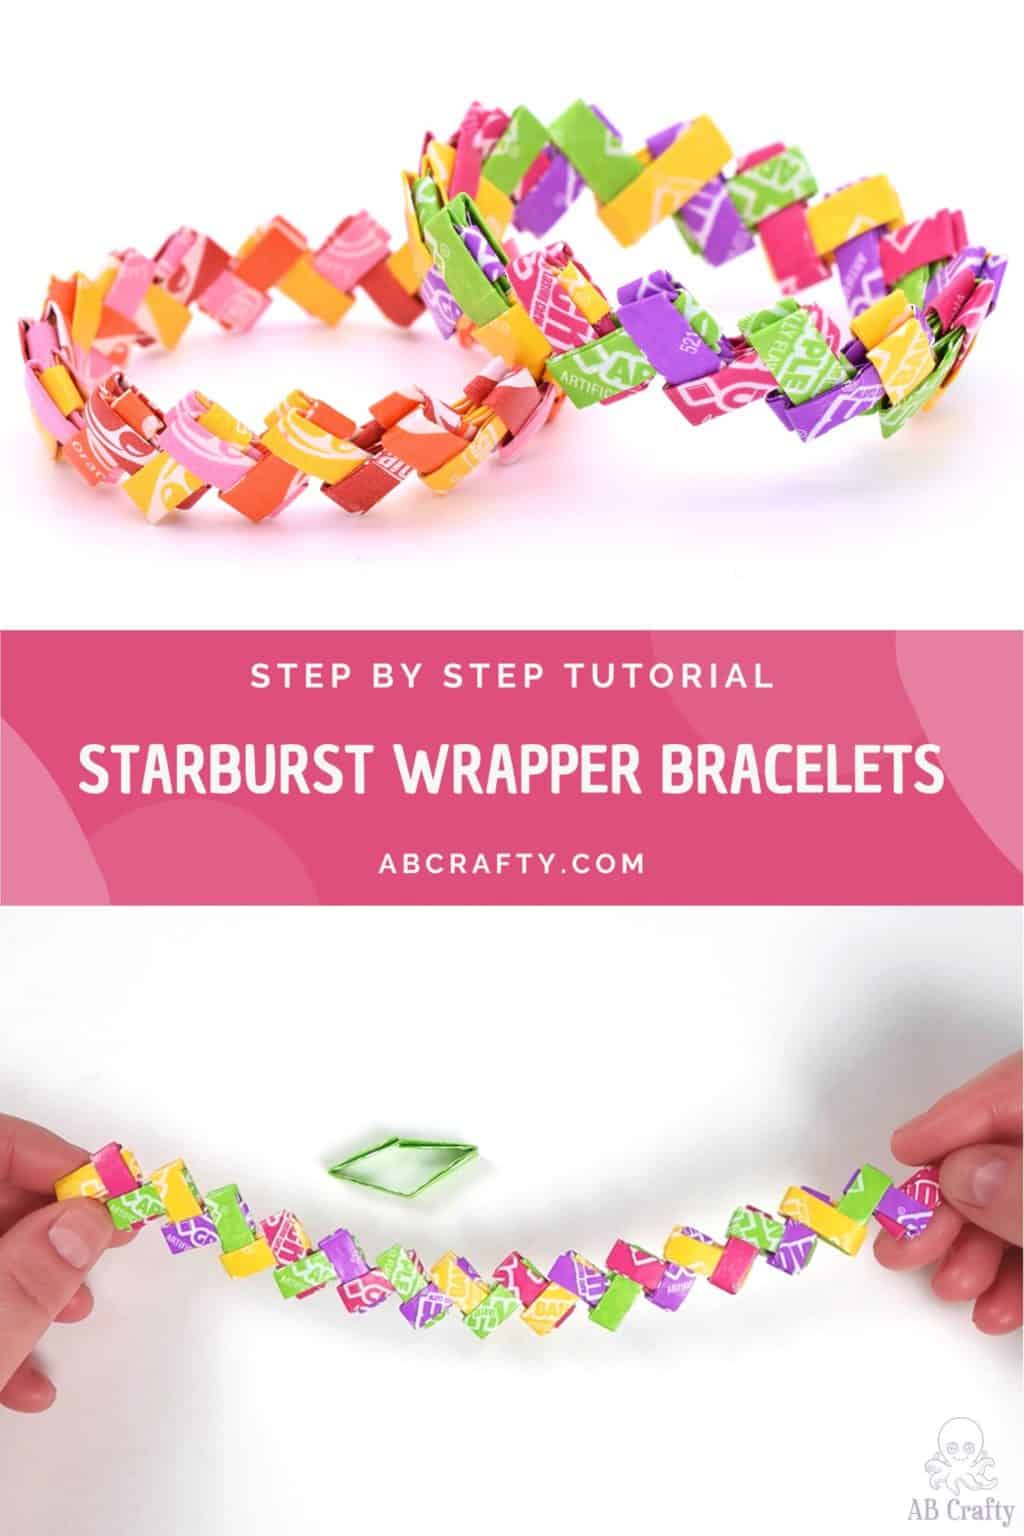
Learn how to make a Starburst wrapper bracelet and gum wrapper chain. You can even use any wrapper you’d like to make this easy bracelet!
Table of Contents
Have you ever seen those pretty bracelets or bags made out of candy wrappers? They always look so intricate and complicated, but I’m here to show you that they’re actually really easy to make! It’s also a fantastic way to upcycle candy wrappers – anyone else still have Halloween candy around? 🙂 You can use any wrappers you’d like – I actually started by learning how to make a gum wrapper chain. But once you know how to make a chain, then you can make a bracelet or other items!
Note: Some links in this post may contain affiliate links, which means at no cost to you, I may earn a commission.
Get the latest DIY tutorials, reviews, and crafting updates
You'll never be spammed and can unsubscribe at any time
Don’t forget to pin it so you can easily come back to it later!
Materials to Make a Starburst Wrapper Bracelet
- Candy Wrappers
I made mine with Now and Later and Starburst wrappers, but you can make yours with whichever wrapper you’d like. Gum wrappers also work great! Simply make sure the wrappers are rectangular.
You May Also Like...
Instructions to Make a Starburst Wrapper Bracelet
Prepare the Gum / Candy Wrapper Chain Pieces
Technically the first step is to actually acquire the wrappers. I don’t recommend unwrapping a bunch of candy, but in theory that’s one way. Then you can keep the candy in a storage container to enjoy later. For mine, I simply collected the wrappers and kept them in a bag. Once I had enough, I made the bracelets. I made bracelets using both Now and Laters and Starbursts.
Start your candy / gum wrapper chain by taking one wrapper and folding it in half, long ways.
Then unfold it and fold one end to the middle. Repeat on the other side.
Fold both sides to the middle again.
Then fold it in half along the original crease so you have a long narrow strip.
Next, you want to fold it in half in the other direction.
Tip: Use a finger to hold the middle down as you fold it over.
Unfold it and again, fold the ends to the middle. Then the last step is to fold it along the crease you made in the previous step.
Repeat the process for all of the wrappers.
Get the latest DIY tutorials, reviews, and crafting updates
You'll never be spammed and can unsubscribe at any time
Making the Candy / Gum Wrapper Chain
Now it’s time to connect all the wrappers into a chain to make the Starburst wrapper bracelet!
Take two of the wrappers and push the ends of one into each side of the other. (In this example, I’m sliding the green one into the yellow one). Then slide it to one side so you can fit one next to it. You should end up with an upside down “V.”
Repeat the process with a new wrapper. Insert a new wrapper into the ends of the previously added one (in this case, I’m inserting the new purple one into the green one). It should begin to make a zig-zag design.
Tip: To easily remember which side to insert the new wrapper, it goes in from the side where there’s a wrapper sticking out. (In this case, the yellow one is sticking out of the green one on the right, so the new wrapper goes in on the right).
Continue to repeat the process and you’ll continue to see the zig-zag design. You can either randomize the colors like I did, or you can do it all in one color or repeat the pattern.
Once you have enough, you want to end in the same direction you started. This means when you wrap it into a circle, the sides will be parallel (note how the pink and yellow ends are parallel).
Double check the length by wrapping it around your wrist. You’ll add one last wrapper so make sure it won’t be too big. If it is, remove 2 wrappers.
Closing the Gum Wrapper Chain to Finish the Starburst Wrapper Bracelet
The trickiest part to making a Starburst wrapper bracelet is finishing it.
Start by opening up the wrapper and sliding each end through one of the last wrappers (green through yellow).
Then bring the other side of the bracelet around so that it’s parallel to the other end. Line up the bottom sides (pink and yellow) and bring the end of the green wrapper under the pink side.
Then bring the green wrapper back through the pink wrapper.
(Since I’m right-handed I flipped the bracelet around so I could continue to easily work from the right).
Then tuck the end of the wrapper (green) into the first side (yellow) to secure it.
Repeat the process with the other end to secure it.
Now your candy wrapper bracelet is ready to wear! Simply slide it over your wrist, and give it a bit of a squeeze to tighten it.
If you make your own candy wrapper bracelet or gum wrapper chain, I’d love to see it! Tag me on Instagram @ab.crafty!
Get the latest DIY tutorials, reviews, and crafting updates
You'll never be spammed and can unsubscribe at any time
Here’s a closeup of the finished Now and Later bracelet. And I also made an actual Starburst wrapper bracelet using the classic flavors.
I love making these bracelets – it’s a great way to upcycle those candy wrappers!
You could also use the whole candies to make a candy lei.
Frequently Asked Questions
What kind of candy wrappers work best to make candy wrapper bracelets?
The best wrappers for making candy wrapper bracelets are Starburst wrappers and Now and Laters. They are thin, lightweight, and the right shape. You can also use gum wrappers, but I personally don’t like the powder on them. If making them as gifts, such as party favours for teens, you can tailor them to the recipient. They’d be great for favors in a birthday party in a box.
You want to use wrappers that can hold a fold and are rectangular in shape.
How many candy wrappers do I need to make a bracelet?
It depends on the size of your wrist, but typically you will need around 20-50 wrappers. I end up using 30-36 for my bracelets and I have a small wrist.
How long does it take to make a Starburst wrapper bracelet?
It typically takes me around 30 minutes to make a bracelet with 30 wrappers from start to finish. It depends on the size of the bracelet and how much time you take to be precise while folding the wrappers.
Do I need any special tools or materials?
No, all you need are some candy wrappers and your hands. You don’t need any glue or any other materials to make the bracelet. However, if you want to add decorations like beads or charms, then you will need those items plus some glue.
What's the difference between a gum wrapper chain and a candy wrapper bracelet?
A gum wrapper chain is simply a chain of folded gum wrappers that are linked together. A candy wrapper bracelet, however, takes the same concept, but loops the chain into a circle and closes the ends.
You can make chains and bracelets using either gum wrappers or candy wrappers.
More Jewelry and Upcycle Crafts to Try
Get the latest DIY tutorials, reviews, and crafting updates
You'll never be spammed and can unsubscribe at any time
Starburst Wrapper Bracelets
Materials
- 20-40 Candy Wrappers
Instructions
Prepare the Gum / Candy Wrapper Chain Pieces
- Fold one wrapper longways.20-40 Candy Wrappers
- Unfold and fold sides to the middle
- Fold sides in again to make a narrow strip.
- Fold in half in the opposite direction. Unfold and fold the ends to the middle. Repeat for each wrapper.
Making the Candy / Gum Wrapper Chain
- Connect all the wrappers into a chain by pushing the ends of one into each side of another.
- Repeat the process until you have the length you want. Finish with the ends parallel to each other. You'll then use one last wrapper to close it.
Closing the Gum Wrapper Chain to Finish the Starburst Wrapper Bracelet
- Open up the wrapper and slide each end through one of the wrappers on the end of the chain.
- Bring the other end of the chain up and put the open wrapper under and back through the end.
- Tuck the end of the wrapper into the first side to secure it.
- Repeat with the other side.
- Slide your bracelet over your wrist, then give it a squeeze to tighten it. Enjoy!